Complete and submit
Organic Importer, exporter or issuing body/control authority
Note
When the organic importer or exporter initiate the COI, they will need to submit the finished document to the issuing body/authority.
When the issuing body/authority start the COI, the option to “submit” is missing. After completing the mandatory boxes these users can directly issue the COI.
How to create a COI?
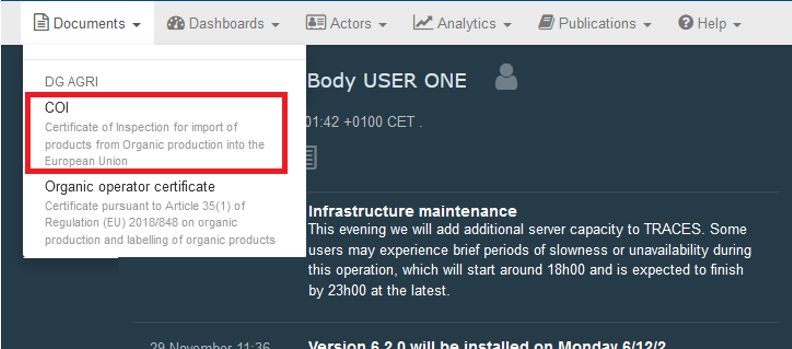
On the homepage, click on “Documents” and then on “COI”:
Click on the green button “+Create new COI”:

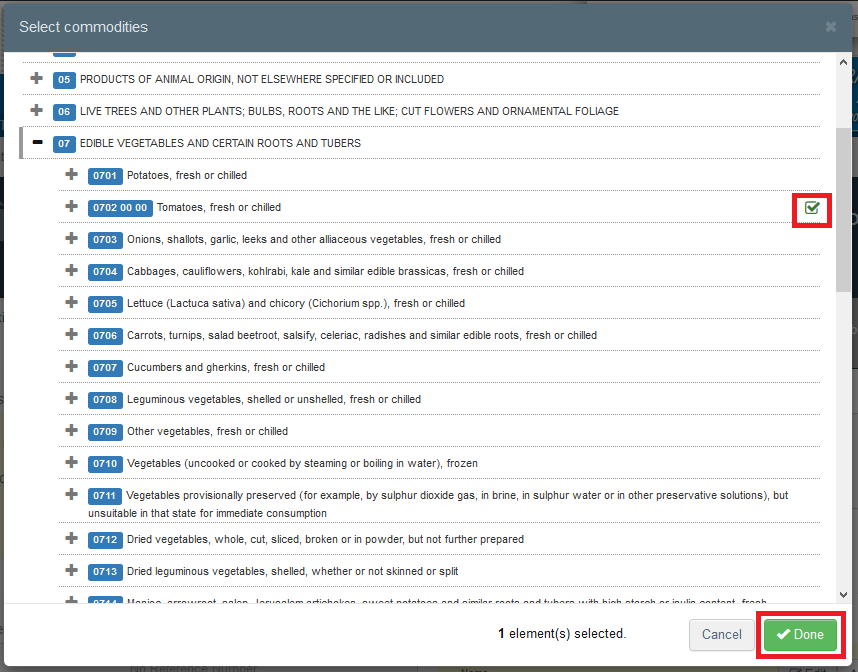
Select one (or more) commodities from the list and click “Done”:
How to complete the document?
Note
All the boxes marked with a red asterisk are mandatory.
Important
Boxes – 1-17 and 24 can be completed by the importer inside the EU, the exporter in the third country or the control body of the exporter. It is however in the responsibility of the issuing authority/body to ensure the correctness of the information before they issue the COI.
Box – 1 – Issuing control authority or control body

To complete this box, it is possible to:
Start typing the name or address of the issuing body/authority and select it from the drop down list that appears;
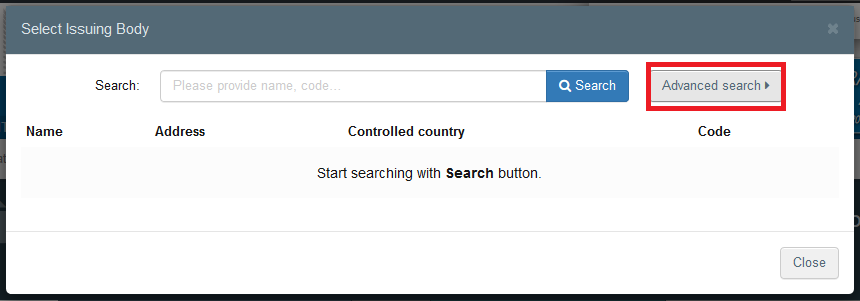
Run an “advanced search” using some filters to narrow the search.

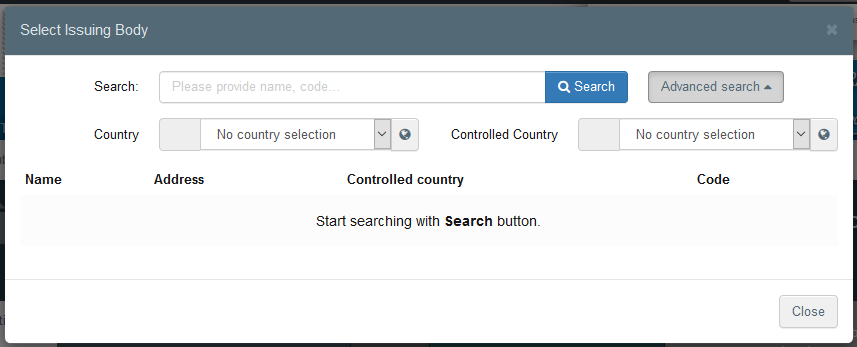
Once the correct match is selected, the “Name”, “Country” and other details of the control body are automatically completed.
Note
If you are signed in as the issuing body/authority and you are only certifying for one country, box – 1 will be automatically filled with the data of the control body/authority you are attached to.
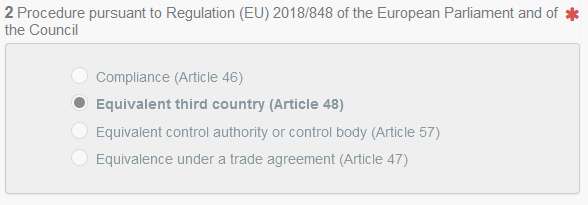
Box – 2 – Procedure pursuant to Regulation (EU) 2018/848 of the European Parliament and of the Council
Note that box – 2 - Procedure pursuant to Regulation (EU) 2018/848 of the European Parliament and of the Council is a mandatory box. But it cannot be filled by the user. The selection is automatically made based on the information in box – 1:
Box – 3 – Certificate of inspection reference number
The box is initially empty but cannot be modified by the user. It will contain the DRAFT reference number of the COI, when the COI is saved as draft and finally the official reference number, when the COI is submitted or issued:

Unnumbered box – Links
This box cannot be edited by the user. In case the current COI is linked to another document in TRACES NT, the reference of the other document will appear here. For example, when the current COI replaces a former COI:

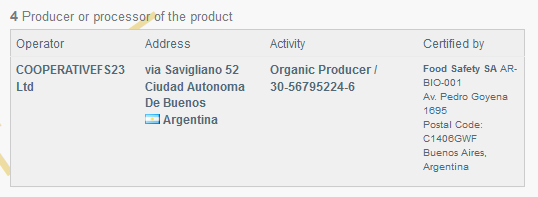
Box – 4 – Producer or Processor of the product
This box is automatically completed when the producer/processor is indicated in box – 13.
Unnumbered box – Other reference numbers
It is possible to include other reference numbers in the COI, a national reference number for example. By clicking the “+ Add reference button” a new line appears that can be completed. The minus behind a line removes this:

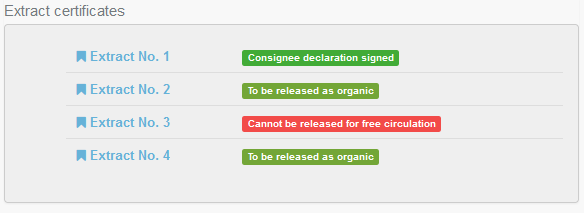
Unnumbered box – Extract Certificates
In case the current COI is a “Base for Extract” and Extract COI have already been created from this COI the link to these extracts with their status is displayed in this box:
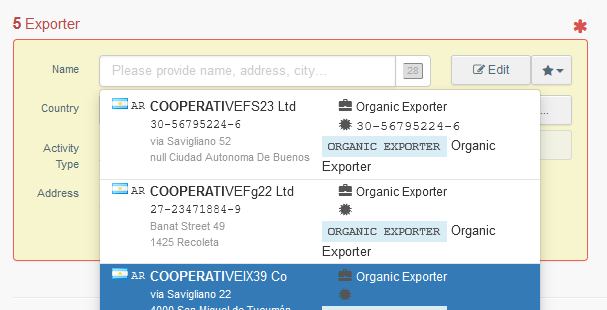
Box – 5 – Exporter
To complete this box, it is possible to:
Start typing the name or address of the operator and select it from the drop down list that appears
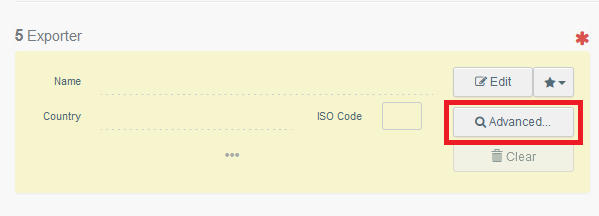
Run an “advanced search” using some filters to narrow the search.
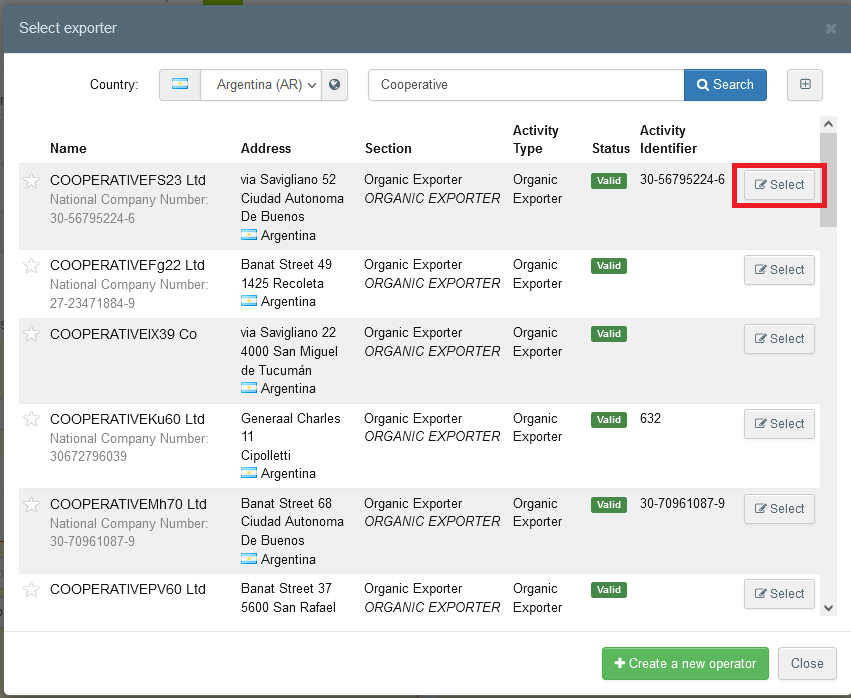
Then select the desired result from the list by clicking the “select” button behind the name.
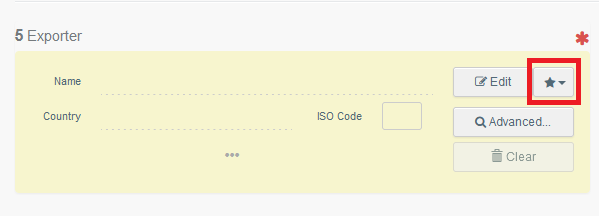
Select an operator that was formerly saved as favourite by clicking on the grey star button.
Tip
How to save an operator as favourite?
In order to start using the favourite operators list, you need to start your favourite operators selection as follows:
The operators displayed in the advanced search list have a star in front of their names. These stars are initially white. When you click on one of the stars it turns yellow, meaning that it has been added to your favourite operators list. When you selected all favourite operators, click on “close” at the bottom of the window:
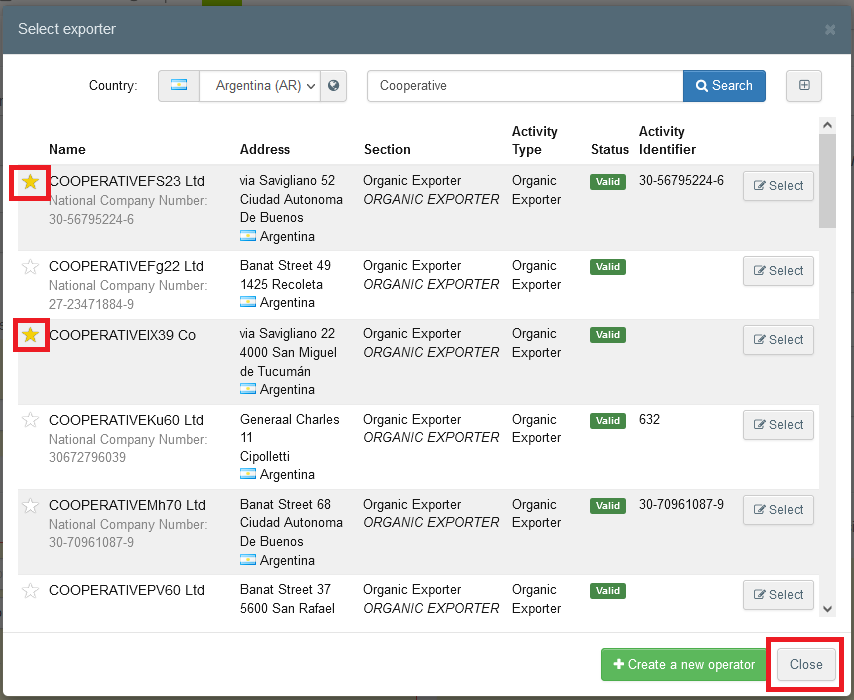
The operators marked with a yellow star will now appear in a list when you click the grey star button inside the operator box.
If the operator is not present in the system, it is possible to create a new operator from inside the COI.
To do so, click on “Advanced search” inside the box where the operator is needed (for example box – 5 – Exporter).
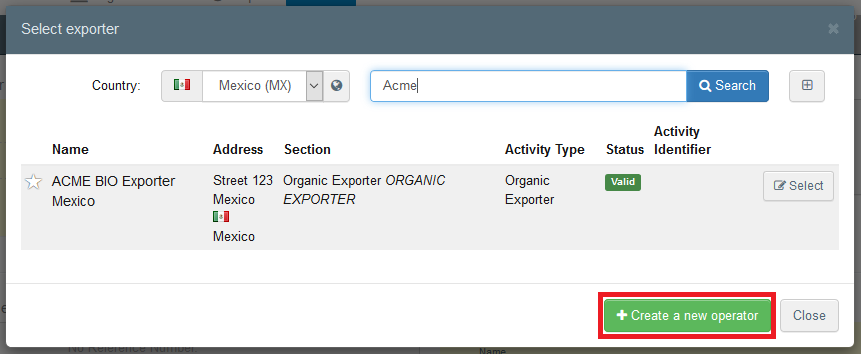
The button “+ Create new operator” will become active after you run a search in the system. You need to do the search first, in order to ensure that the operator doesn’t exist already and so avoid that you create a duplicate entry.
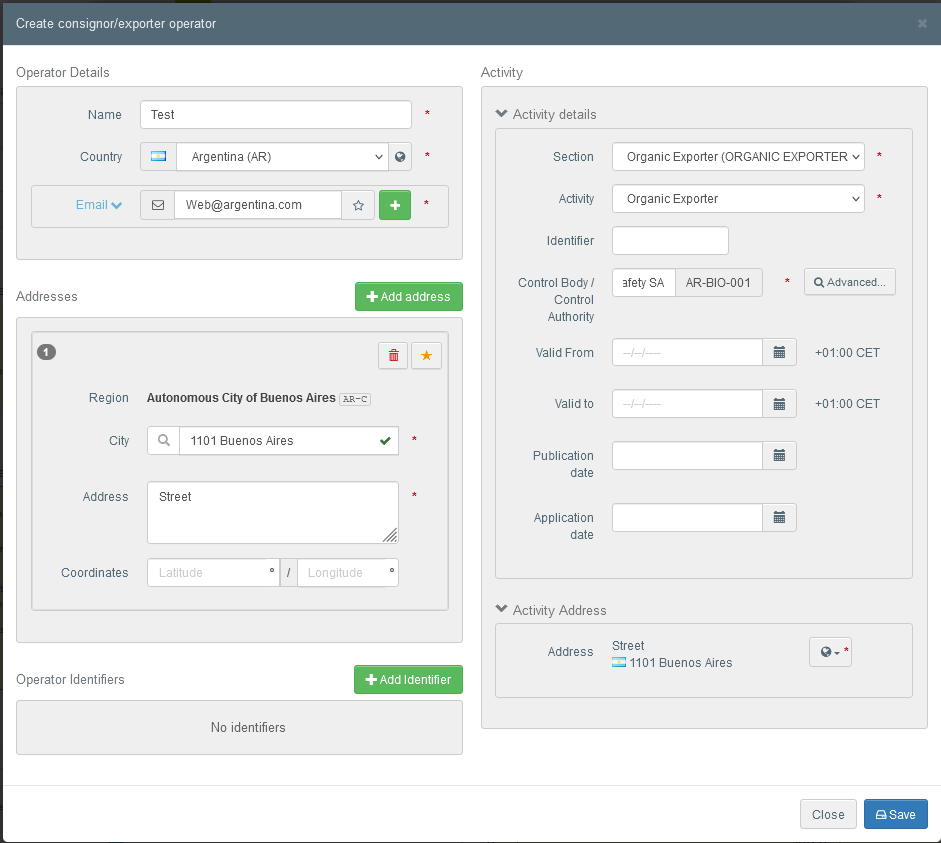
In the window that appears, please make sure you select all mandatory information and then click on “save” at the bottom the operator is saved and the option to select it appears. Please click on that as well:
It is also possible to click on “Edit” and modify the content of the Box or to clear it and select another exporter, by clicking on the “Clear” button:

Box – 6 – Operator who buys or sells the product without storing or physically handling the product
To complete this box, it is possible to follow the same procedures as described for box – 5 – Exporter.
Note that box – 6 is not mandatory. Where applicable, name and address of one or more operators who buy or sell the product without storing or physically handling the product need to be provided.
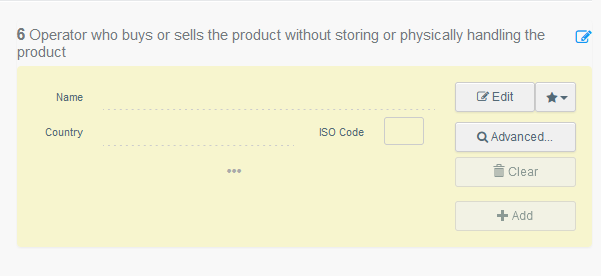
If you want to add more than one operator in box – 6:
Click the “add” button:
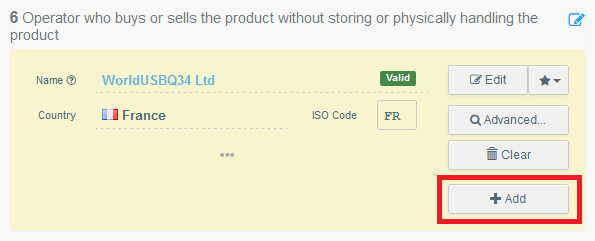
This will open a new field, where an additional operator can be added:
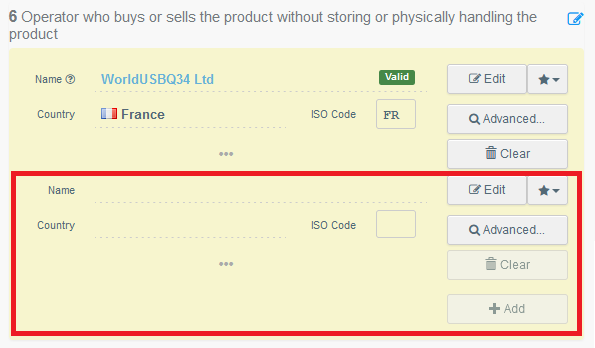
Once this field is completed, the “add” button becomes available again and as many operators as needed can be added.
Box – 7 – Control authority or control body
Box – 7 cannot be edited by the user. This box is completed with the control body information from box – 13.

Box – 8 – Country of origin
You can select one or more countries of origin.
Start typing the name in the search box, when the country appears, click on the name to add it to the list of countries of origin.
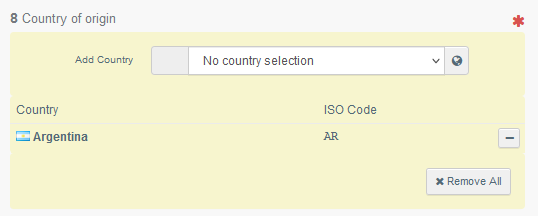
By clicking on the minus behind each row you can delete each country individually.
Click “x Remove all” to clear the complete box.
Box – 9 – Country of export
The country of export is the last 3rd country where the product has been subject to the last operation for the purpose of preparation as defined in Article 3, point (44), of Regulation (EU) 2018/848 and sealed in appropriate packaging or containers.
You need to select the country from the drop-down menu.

Box – 10 – Border control post / point of release for free circulation
The box can be completed in the same way as box – 1.
For consignments subject to organic import controls at border control posts (BCPs) pursuant to Article 45(5) of Regulation (EU) 2018/848, it is mandatory to select in this box a BCP designated for checks on the categories of organic and in-conversion products in the consignment.
For products exempted from organic import controls at border control posts in accordance with Article 3 of Delegated Regulation (EU) 2021/2305 it is mandatory to select a point of release for free circulation. To do so, click on the grey box appearing in box 10 and select “point of release for free circulation”. (see also the Notes for the completion of the model COI in relation to box 10 in Commission Delegated Regulation (EU) 2021/2306).

Box – 11 – Country of destination
The box is automatically completed with the country where the first consignee (in box – 24) is based.

Box – 12 – Importer
To complete this box, it is possible to follow the same procedures as described for box – 5 – Exporter.

Note
The box first consignee in the European Union has been moved to box – 24, further down the page. But the importer, exporter or issuing body can still complete the information at this point.
Box – 13 – Description of Products
Fill-in the requested information for each box by typing or selecting an option from the drop-down menu. Don’t forget to define the quantity and weight unit.
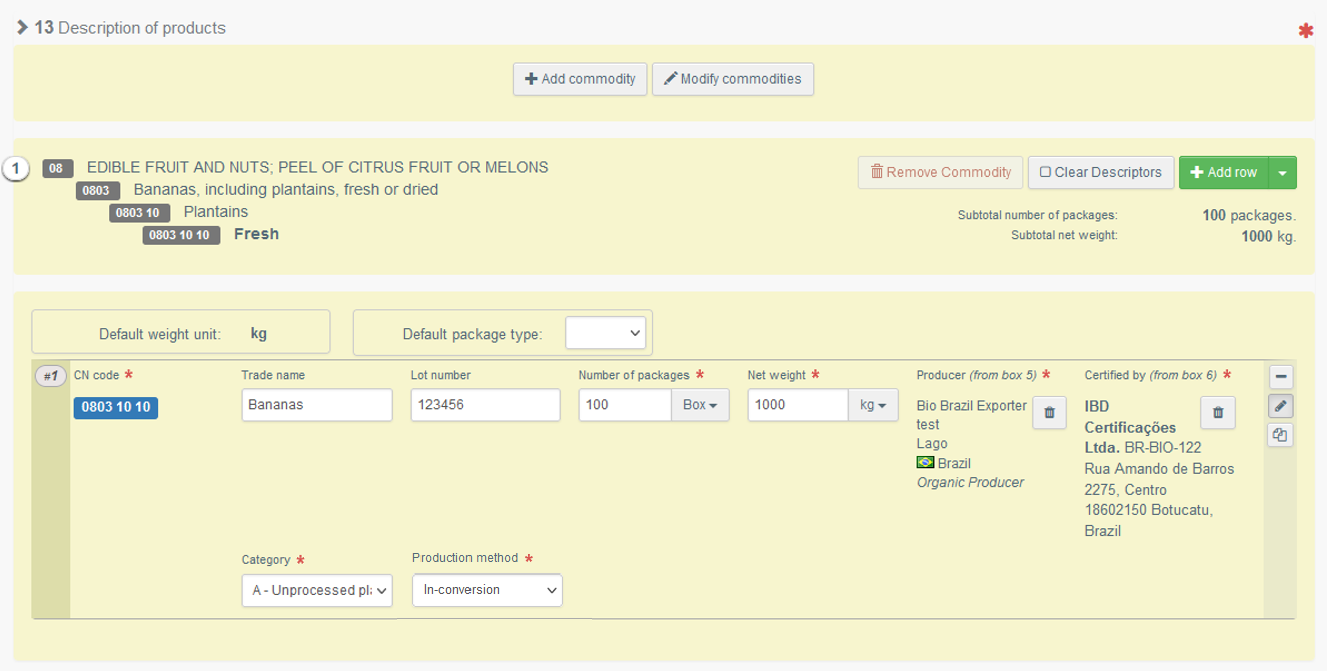
Several other options are also available:
“+ Add new commodity” or “Modify commodities” will allow you to add a CN code or change the CN code selected.

“Remove commodity” will delete the selected commodity from the certificate.
“Clear Descriptors” or “+ Add row” will affect the lines of commodities included in the certificate. You can also delete, modify or add 5, 10, 50 or 100 rows by 21 clicking on the small icons on the right side of the box

Default weight unit and package type: You can select a default weight unit and packaging type for all commodity descriptor rows. When selected, these will automatically be added to all rows, where commodities can be described.

In case, there is only one option for the weight unit foreseen for a CN code, this default net option is automatically pre-selected – as shown in the capture above.
The selected default option will be displayed in every row, but can be changed individually for each row, in case one of the consignments is delivered in a different package or the weight unit is different.
Box – 14/15 – Container No/ Seal No
These boxes are not marked as mandatory. However, as soon as the commodities are delivered in a container, the container number needs to be indicated. The same applies to a seal: as soon as the commodities are delivered sealed, the seal number is mandatory.
It is possible to indicate either the seal number or the container number or both. As soon as you start completing one of the boxes, a new empty row for box – 14 and 15 appears.

Note
The Container number needs to comply with the official format: 3 capital letters, then a capital U, J or Z, followed by 7 numbers.
Box – 16 – Total gross weight
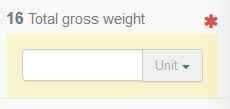
Indicate the total gross weight of all organic products listed in box – 13. This weight can be equal to the total weight of all products in box – 13 or higher. Please don’t forget to select the weight unit.
Note
The gross weight concerns the organic part of your shipment covered by the certificate of inspection and certify in accordance with the relevant EU organic regulation.
Box – 17 – Means of transport before point of entry into the Union
Click on the button “Add means of transport”.
Select the means of transport that arrives at the BCP or at the point of release for free circulation and complete the mandatory fields.

Choose the type of transport from the list: “Railway”, “Road vehicle”, “Airplane” or “Vessel”;

Depending on the type of vehicle, you may need to enter the specific identifiers.
If the means of transport already exists in the system, select it from the drop down list that pops out (Airplane: Flight number; Vessel: Ship’s name; Road vehicle: Vehicle registration; Railway: Identifier). If it does not exist in the system, click on the green button “+ Create” after completing the mandatory fields.

Note
It is possible to add several means of transport and to change their order by dragging the items with the double sense arrows on the left.
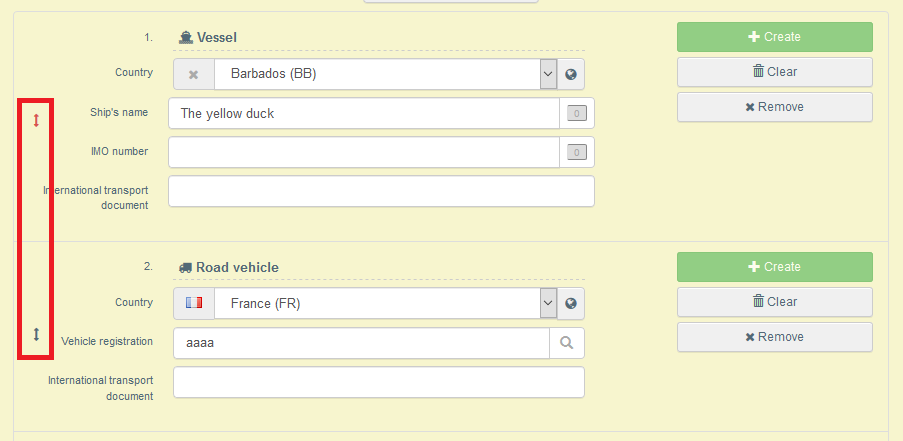
In case you selected too many boxes for means of transport, click the “remove” button next to the box that isn’t needed. An empty or not completely filled box will cause an error message, when you try to sign or submit the certificate.
Unnumbered box – supporting documents
The purpose of this box is to provide any other relevant documents.
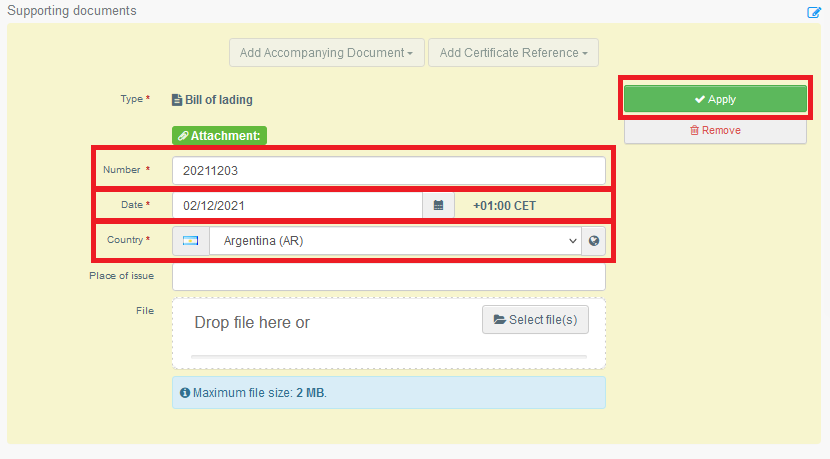
“Add Accompanying Document”: choose the type of document from the corresponding drop-down list and enter all relevant information, such as “Number”, “Date” and “Country”. If you wish to upload a file, then click on the “Select file(s)” button. Don’t forget to click on “✓ Apply”.
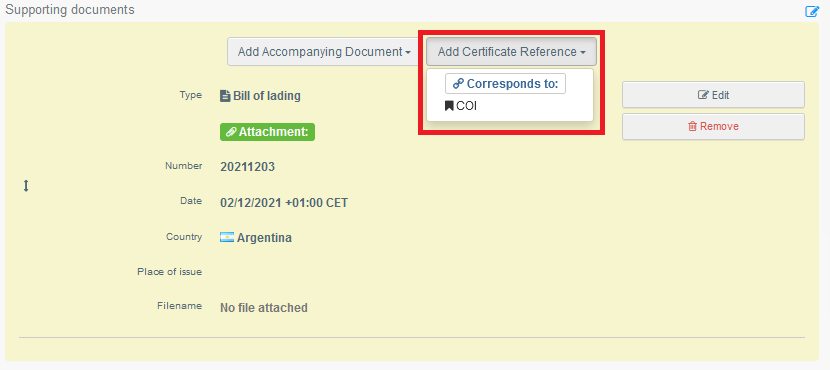
“Add Certificate Reference”: the certificate reference is the reference of a certificate that is issued in TRACES NT. Fill in the number of the certificate.
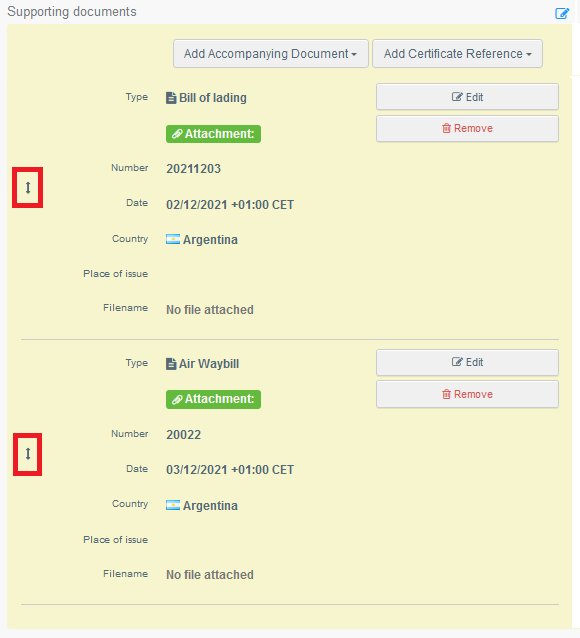
It is possible to add several accompanying documents and to order them by dragging and dropping the items with the double sense arrows on the left.
Box – 20 – Prior notification
In case a consignment of products intended to be placed on the Union market as organic products or in-conversion products is subject to official controls at border control posts or points of release for free circulation, the estimated arrival date and time at the border control or point of release for free circulation post needs to be indicated here by the importer or, where appropriate, the operator responsible for the consignment. Please see the minimum time requirements included in the legislation.

The information in this box can be updated by the importer or its representative prior to the arrival of the consignment at the border control post or point of release for free circulation
Important
All the relevant information that is needed to issue the COI has now been completed. But before the COI is submitted to the issuing body/authority it is possible for the importer or exporter to also complete the following boxes.
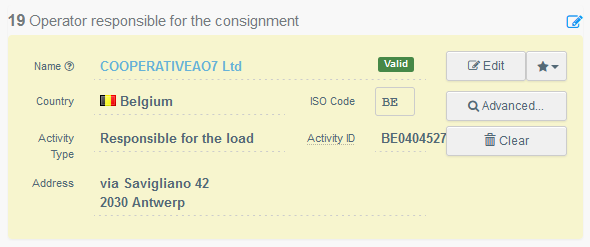
Box – 19 – Operator responsible for the consignment
Operator responsible for the consignment’ is a natural or legal person established in the Union who presents the consignment at the border control post on behalf of the importer.
This box may be completed only in the case in box – 10 the option BCP is selected.
The name, address and the EORI number of the operator responsible for the consignment must be completed by the importer indicated in box – 12, if the operator responsible for the consignment is different from this importer.
To complete this box, it is possible to follow the same procedures as described for box – 5 – Exporter.
Box – 21 – For transfer to
Note
This box is optional (the operator may chose that organic identity and physical checks are carried out at the border control post).
However, in case the transfer to a control point for sanitary or phytosanitary identity and physical checks has been requested by the completion of box I.20 in a related CHED-D or CHED-PP, the importer or the operator responsible for the consignment must also tick the option in box – 21 of the COI, to request transfer to the same control point as the one indicated in the CHED, for organic identity and physical checks.
To request the transfer the importer or the operator responsible for the consignment, need to tick the option in this box in case they wish to request the transfer of the products to a control point in the Union for the performance of organic identity and physical checks at that control point, if the consignment is selected for organic identity and physical checks by the competent authorities at the border control post.

Note
This box applies only to products subject to official controls at border control post indicated in box – 10.
Box – 22 – Details of the control point
The importer or the operator responsible for the consignment must indicate the name of the control point in the Member State where the products are to be transferred for organic identity and physical checks in case the consignment is selected for such checks by the competent authorities at the border control post.

Note
Only if the option in box – 21 is selected, box – 22 becomes mandatory. Otherwise the box cannot be edited.
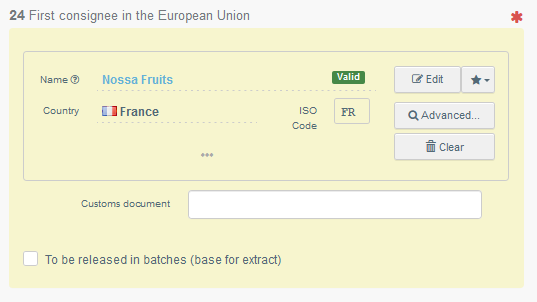
Box – 24 – First consignee in the Union
The box can be completed in the same way as described for box – 5 – Exporter:
Note
The first consignee in box – 24 is mandatory, even if the option “to be released in batches” is selected. The information needs to be completed before the verification of the consignment and the endorsement of the certificate of inspection by the competent authority.
The first consignee of a COI that is marked as a Base for extract will automatically be indicated as consignee of the Extract COIs – but the information in the Extract COI can be updated – see further below in this guide.
Submitting the Certification
If you are an organic importer or an organic exporter and you completed all mandatory fields you can now submit the COI for certification to the issuing body by clicking the blue button “Submit certification as”.

Note
If some of the boxes have been completed incorrectly, an “Error” message will appear at the bottom of the page.
If you click on the expand sign you will be able to read the message in detail. Click on each of the messages, to be redirected to the box where the error appeared and correct the mistakes.
Issuing
The user needs to select the option to sign the declaration digitally:
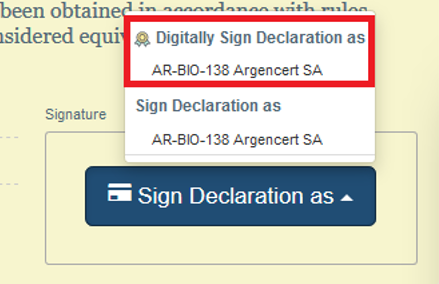
This will open the PDF version of the COI where the digital seal needs to be confirmed.
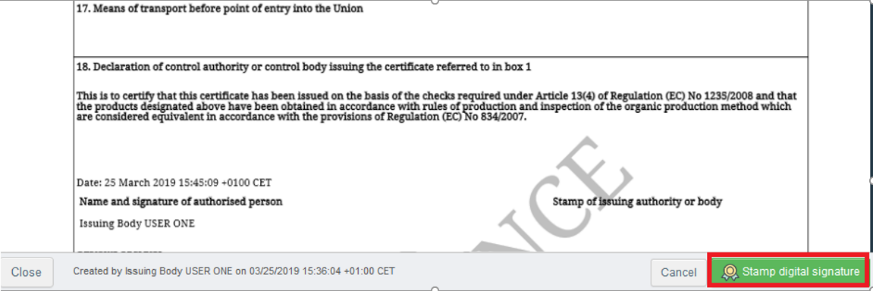
After the confirmation above, the user is again redirected to the entry form of the document. The document reference is followed by an icon, signaling that the certificate has been signed digitally:

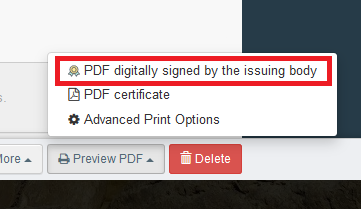
The digitally signed PDF is added to the options on the “Preview PDF” button:
Updating a COI
As the COI is issued before the consignment leaves the third country, there are some boxes for which the information might change before the consignment reaches the EU, as explained below. The following boxes can be modified.
Note
If the COI has been issued with the application of a digital seal, the changes made to the following boxes are not visible in the PDF digitally sealed by the issuing body/authority. They will be applied to the PDF that is digitally sealed by the endorsing authority.
Updates possible for the issuing body
The issuing body will be able to change the following boxes in an issued COI:
Box – 10 - Border control post / point of release for free circulation
Box – 13 – Description of the products (Only the number of packages and the net weight)
Box – 14/15 – Container No/Seal No
Box – 16 – Total gross weight
Box – 17 – Means of transport before the entry into the Union
Supporting documents
Updates possible for the importer or responsible for the consignment
Although the majority of boxes is fixed, once the COI has been submitted to the issuing body or issued by them, some information can still be updated by the importer, the responsible for the consignment or the issuing body after the COI has been issued.
The following boxes are the boxes that the importer can update in an issued COI:
Box – 10 - Border control post/point of release for free circulation
Box – 19 - Responsible for the load
Box – 20 – Prior notification
Box – 23 – Special customs procedures
Box – 24 - First consignee
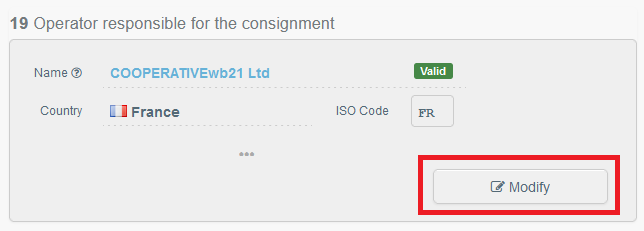
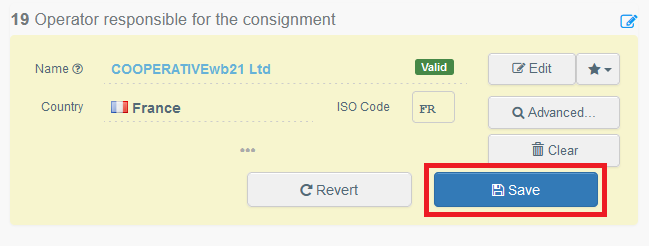
All these boxes have a “modify” button. By clicking this button the box becomes editable. Once you updated the information, click the “save” button inside the box to commit the changes.
Note
Updating the boxes is only possible, when the COI is in status “Description completed” or “Issuing Body Declaration Signed”. Once the COI is in the process of the verification of the goods or endorsed, changes are no longer possible.