Create a CHED-PP
On the homepage, click on Certificates ➔ CHED
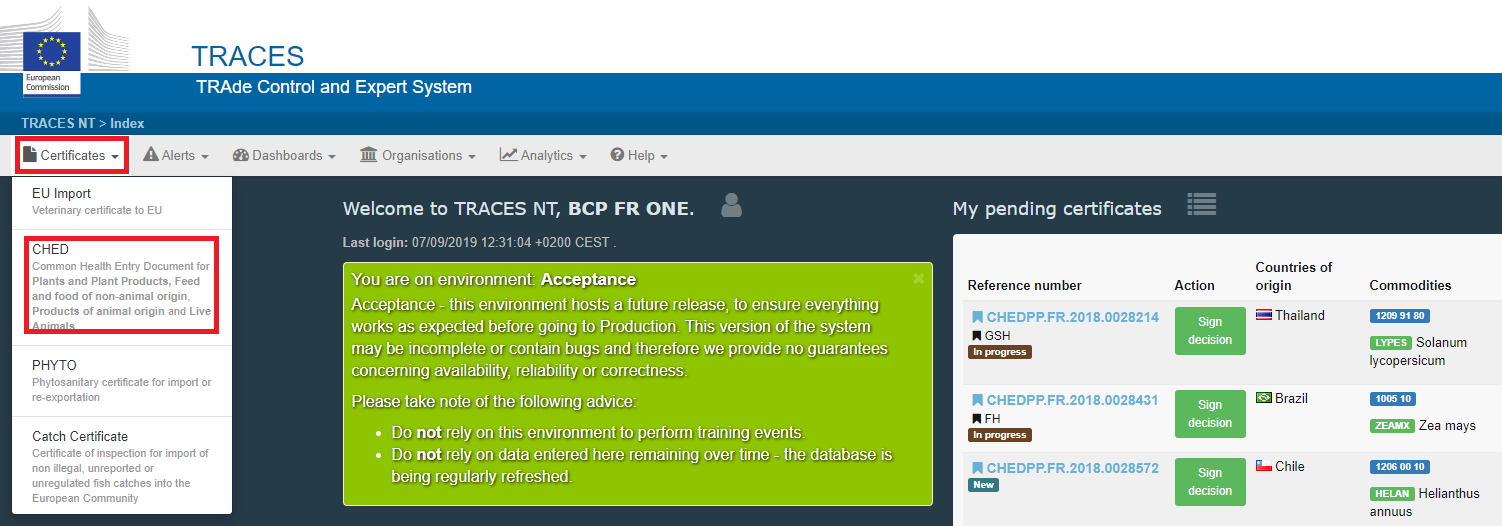
Click on the green button +Create new CHED

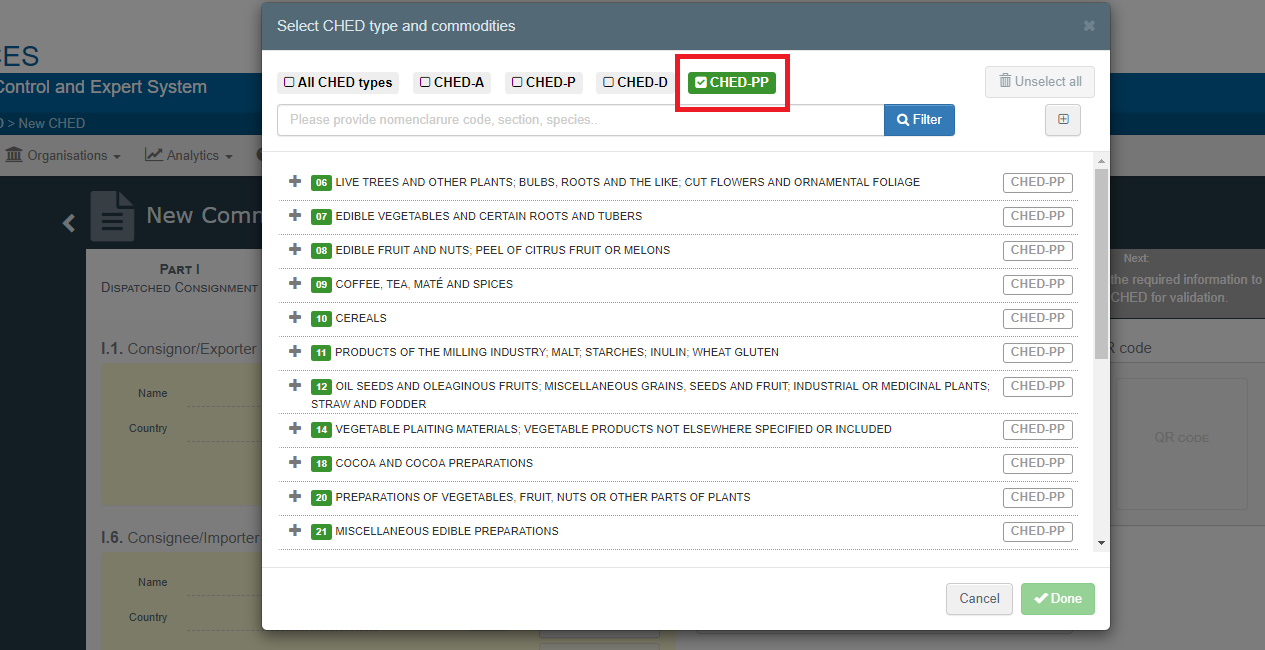
Tick the CHED-PP box:
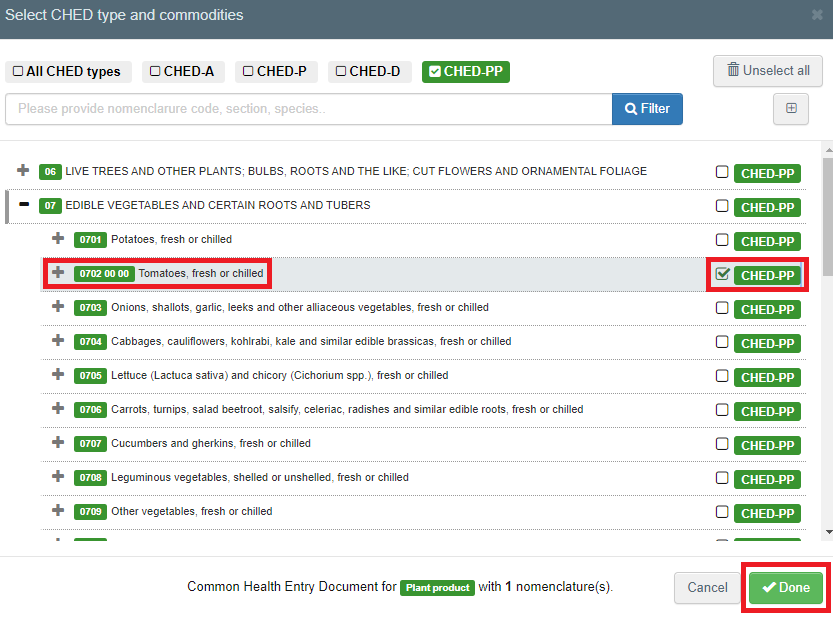
Select one (or more) commodities from the list, tick the box CHED-PP on the right and click on Done.
PART I – Description of the consignment
As Responsible for the Consignment (RFC)
How to fill in the document?
Note
As Responsible for the Consignment (RFC)

Mandatory boxes *:
Box – I.1 Consignor/Exporter
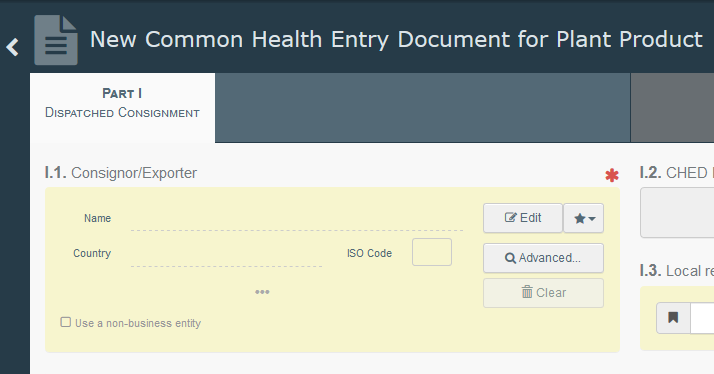
To fill in this Box, you have the option to:
Start typing the name or address of the consignor/exporter and select a company from the drop-down list that pops out;
Select a company from the “Favourite operators” list by clicking on the grey star;
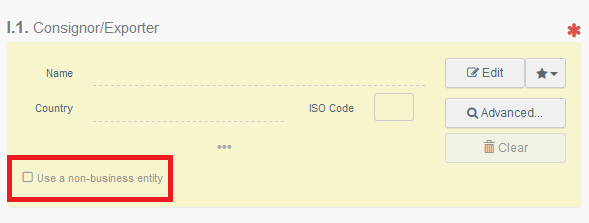
You can also use and insert the details of a private individual by ticking the box “Use a non-business entity”. Further details on this option are provided in Point 2.9.
Run an “advanced search” using corresponding filters to narrow the search.
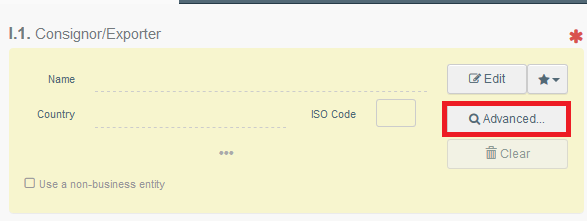

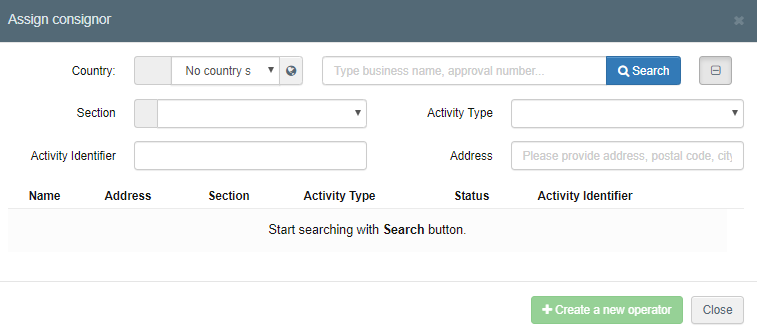
Once the correct match is selected, the “Name”, “Country” and “ISO Code” of the company are automatically filled inside the box.
If the operator is not present in the system, you have the option of creating a new operator. To do so, click on “Advanced search”
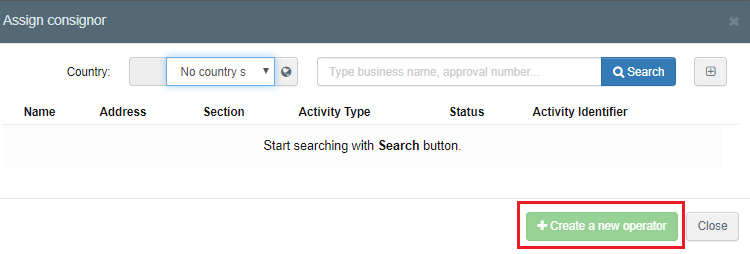
The button + Create new operator will become active after you run a search in the system. This is to ensure that there are no duplicates present in the system.
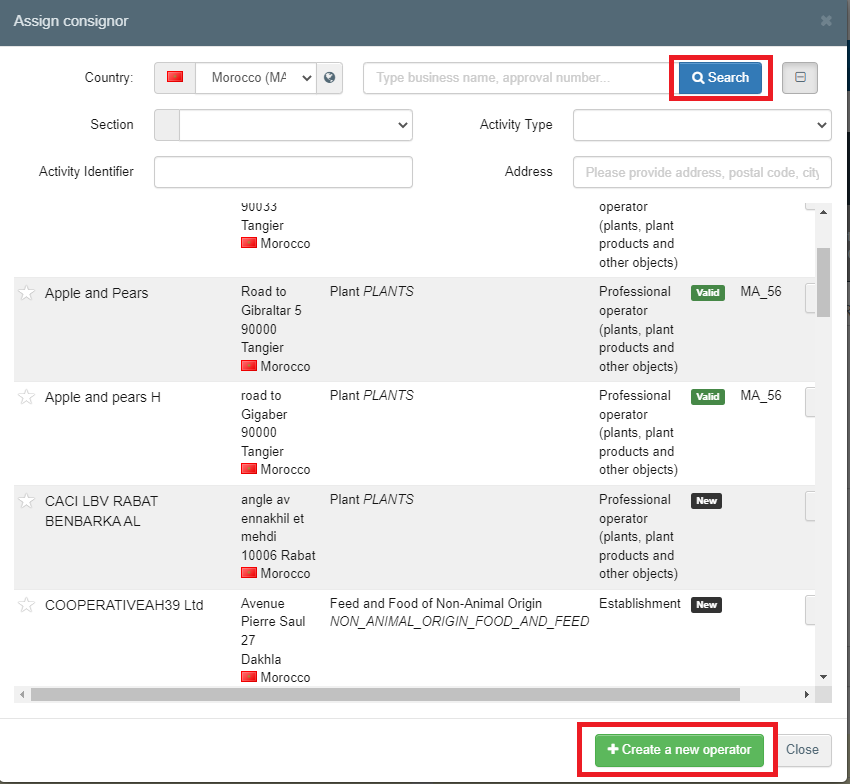
It is also possible to click on “Edit” and modify the content of the Box or to clear it completely and select another consignor/exporter by clicking on the “Clear” button.
Box – I.6 Consignee/Importer:
To fill in this box, simply follow one of the procedures described in point 2.1.
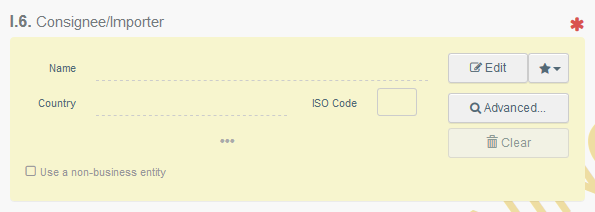
Note
The option “Use a non-business entity” is explained in Point 2.9.
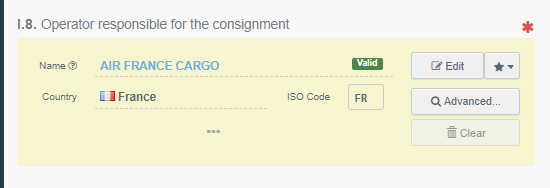
Box – I.8 Operator responsible for the consignment:
To fill in this box, it is possible to follow one of the procedures described in point 2.1 (except for the option “use a non-business entity”).
Normally, this box is automatically filled in by the system, which recognises the operator RFL that has initialised the CHED.
Box – I.4 Border control post/Control Point/Control Unit: when an operator responsible for the consignment is selected in box – I.8, the system automatically suggests the Border control post in box – I.4 that is the responsible authority for that Responsible for the consignment. You can then add the suggested BCP to the document clicking on the button “Select”.
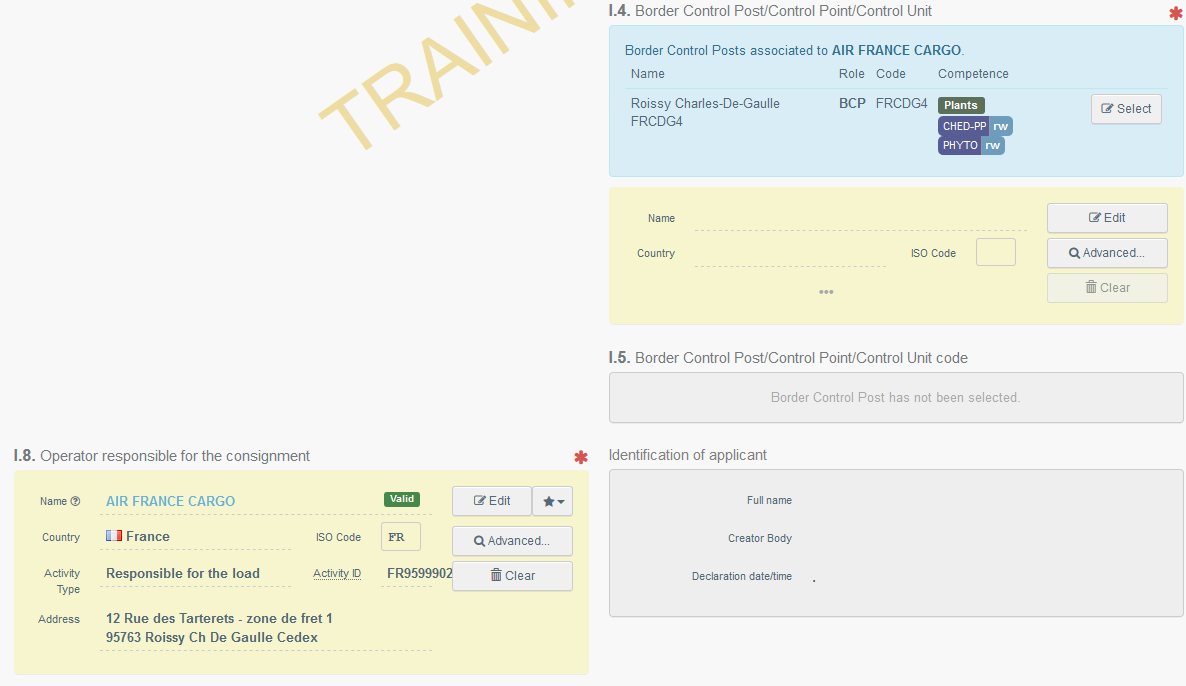
Alternatively, you can select another BCP by typing the name or address, and selecting it from the list. You can also run an advanced search.
Box – I.5 Border Control Post code /Control Point/Control Unit code : This Box will be automatically filled in once box – I.4. is completed.
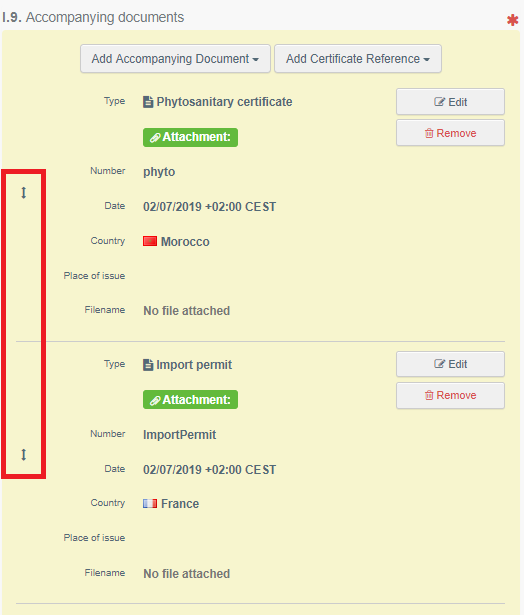
Box – I.9 Accompanying documents: there are two options:

Click on the button “Add Accompanying Document” and select the type of document to add from the drop down list. Insert the “Number” and “Country”, and then click on “✓ Apply”.
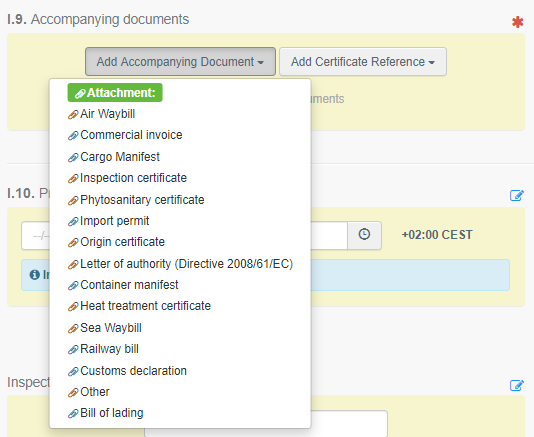
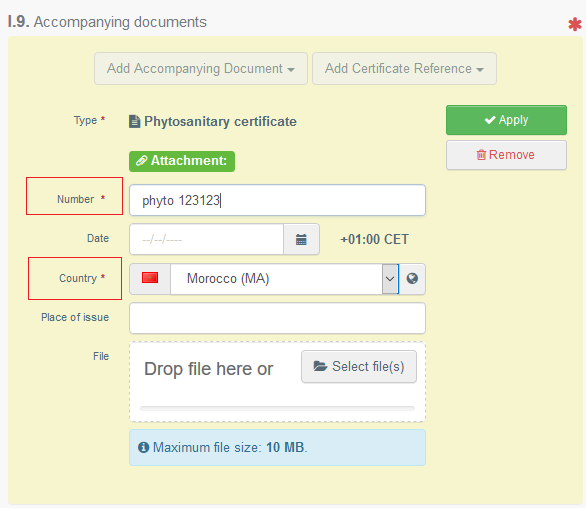
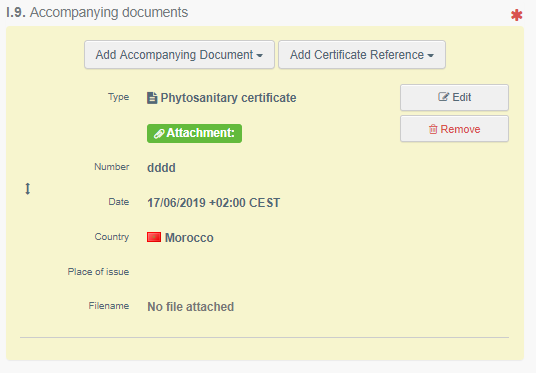
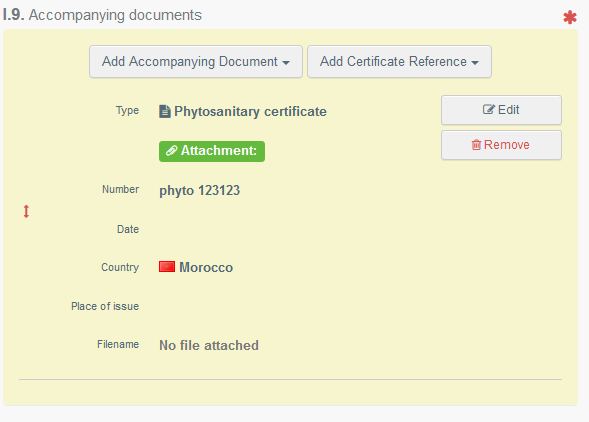
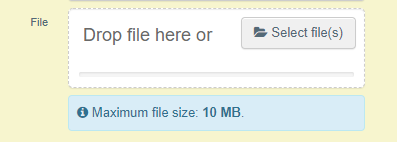
You also have the option to attach a file with a maximum size of 10MB.
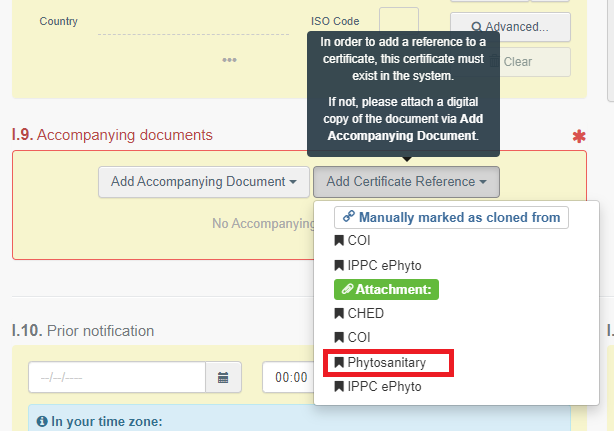
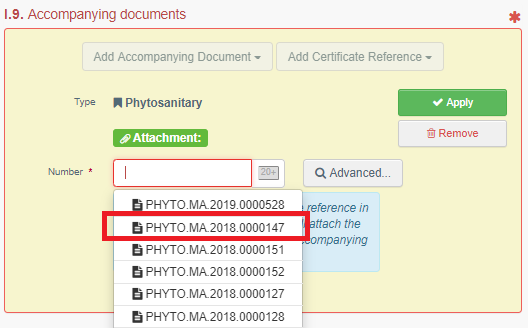
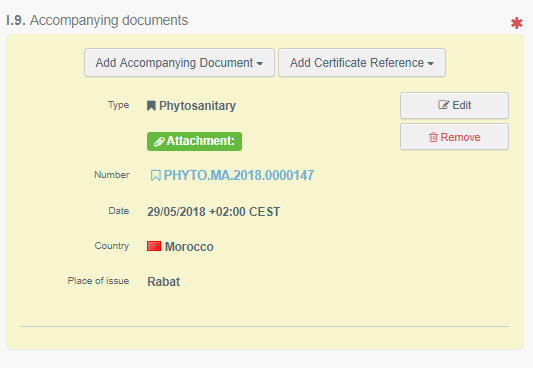
Click on the button “Add Certificate Reference” if the document you wish to add already exists in the system. Select the type of document between “CHED”, “COI”, “Phytosanitary”, “IPPC ePhyto” then type the reference number of the document and select it from the drop down list.
Note
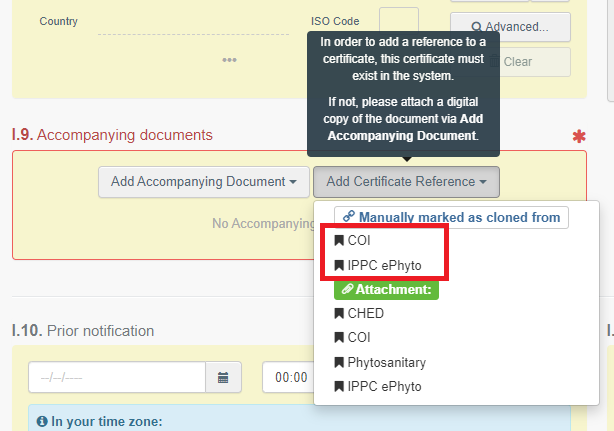
It is possible to link a COI or an IPPC ePhyto to a CHED-PP at this stage. This function of manually mark as clone documents is further described in the chapter IPPC ePhyto and COI .
Note
It is possible to add several accompanying documents and to order them by dragging and dropping the items with the double sense arrows on the left. Only the first document will be shown in the PDF version of the CHED-PP.
Box – I.10 Prior Notification: indicate the date and time of arrival of the consignment to the BCP.

Box – I.7 Place of Destination: this box is filled automatically with the information provided in box – I.6 Consignee/Importer. However, it is possible to change it following one of the procedures described in point 2.1.
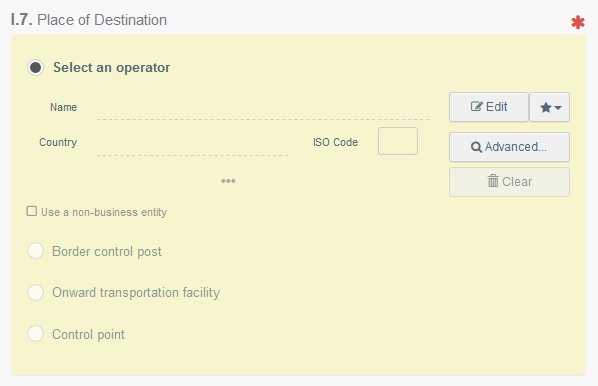
Options Border control post, Onward transportation facility and Control point can be selected according to the Purpose selected in box – I.20./I.20./I.22./I.23./I.23./I.24./I.25/I.26 Purpose.
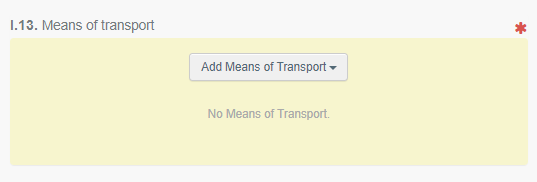
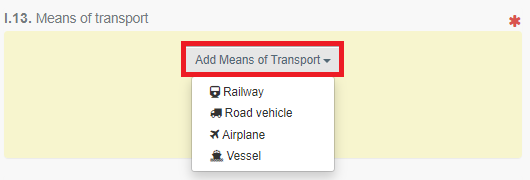
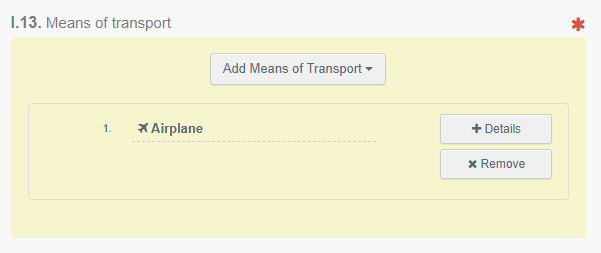
Box – I.13 Means of transport: click on the button “Add means of transport”, select the means of transport by which the consignment arrives at the BCP and fill in the mandatory fields.
Choose the type of transport from the list: “Rail”, “Road vehicle”, “Airplane” or “Ship”;
Note
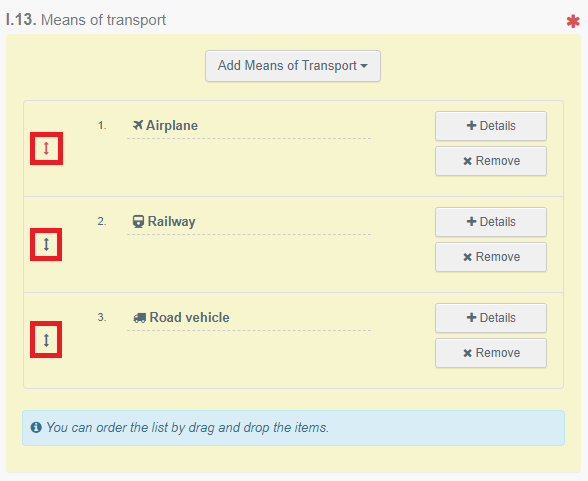
It is possible to add several means of transport and to order them by dragging and dropping the items with the double sense arrows on the left.
Box – I.14 Country of dispatch: Select the last Country of dispatch before the consignment entered the EU from the list:

Boxes – I.20/I.22/I.23/I.24/I.25/I.26 Purpose: Select the purpose of the document among the options in boxes – I.20 - I.26
Select box – I.20 “For transhipment” when the Documentary check is done at the first BCP, but the consignment is allowed to move to a second BCP where Documentary, Identity and Physical checks will be performed (the second BCP can be in the same MS, or in another MS). The consignment changes the means of transport. It is still under custom supervision and cannot be released until the Official controls are completed.
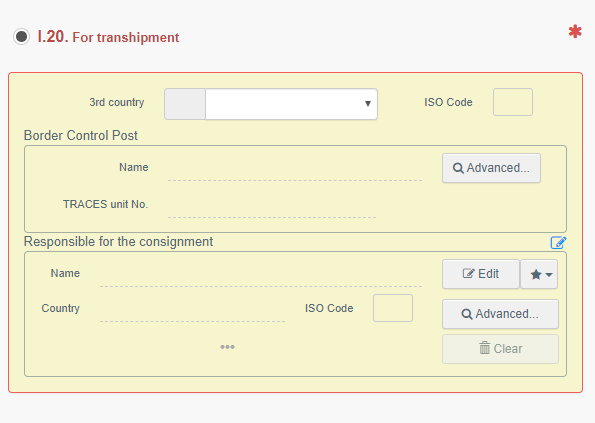
Choose the BCP to which the consignment is authorised to move after Documentary checks. Here you can also specify the responsible for the load (if different from the previous one) that will be in charge of the consignment to move.
Select box – I.20 “For transfer to” when the Documentary check is done at the BCP, and the consignment is authorised to move to a Control Point where Identity and Physical checks will be performed. The consignment is still under custom supervision and cannot be released until the Official controls are completed.
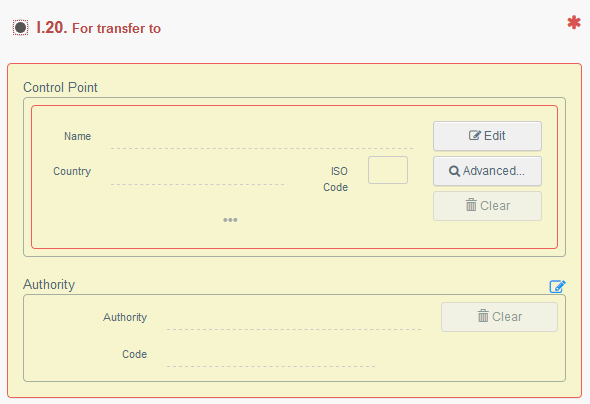
Choose the Control Point to which the consignment is authorised to move after Documentary checks.
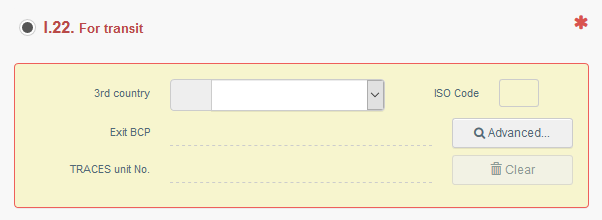
Select box – I.22 “For transit” when the consignment, coming from a third country, will pass through the EU territory to arrive to its final destination in another third country. (E.g. Russia – France – Australia)
Select box – I.23 “For internal market” when all the checks are performed at the first BCP.

Select box – I.23 “For private import” when the goods have been introduced in the EU by a private individual and on an occasional basis.

When you select this option, you can Use a non-business entity in boxes – I.1 and I.6.
The data of the private individual that you will provide will not be kept in the system and they will be available only in the CHED-PP where they are added.
Select box – I.25 For re-entry when the consignment to be exported to a third country has been rejected at the third country border, and is now re-entering the Union.

Box – I.31 Description of the goods: Here you can add commodities to the document by clicking the button “+ Add commodities”.
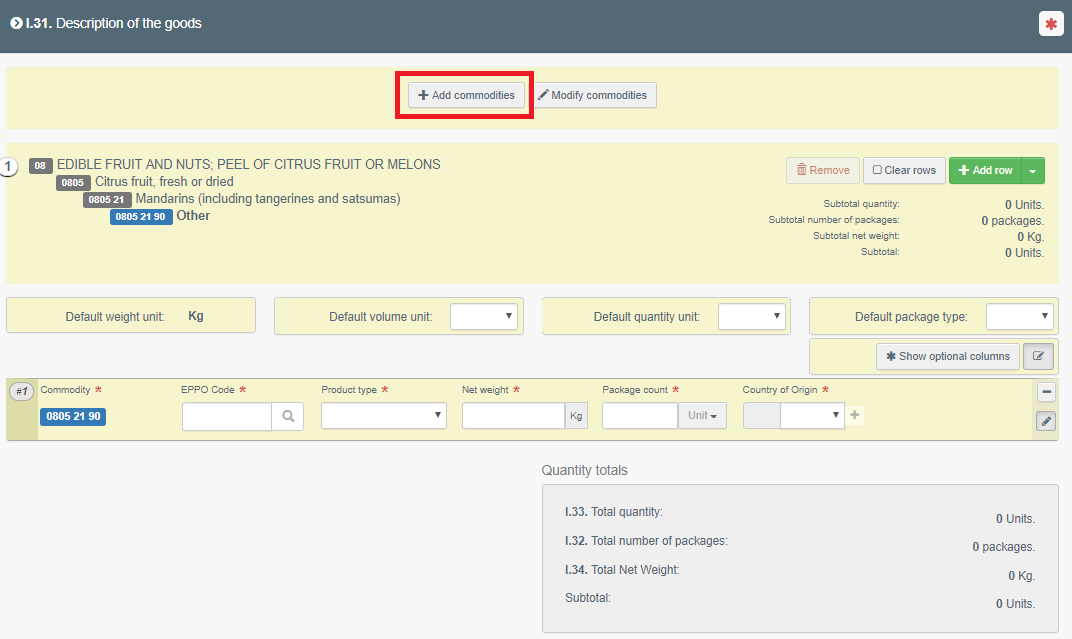
To manipulate each of the commodities included in the document, different options are available:
Use the button “Remove” to delete the commodity from the list;
Use the button “Clear rows” to delete all the details and information provided with the commodity. Each row can be also independently removed by clicking the minus button ( - ) on the right;
Use the button “+ Add row” to add another commodity line;
To delete a commodity line, click on the “-“ button on the right, and then on the bin icon.

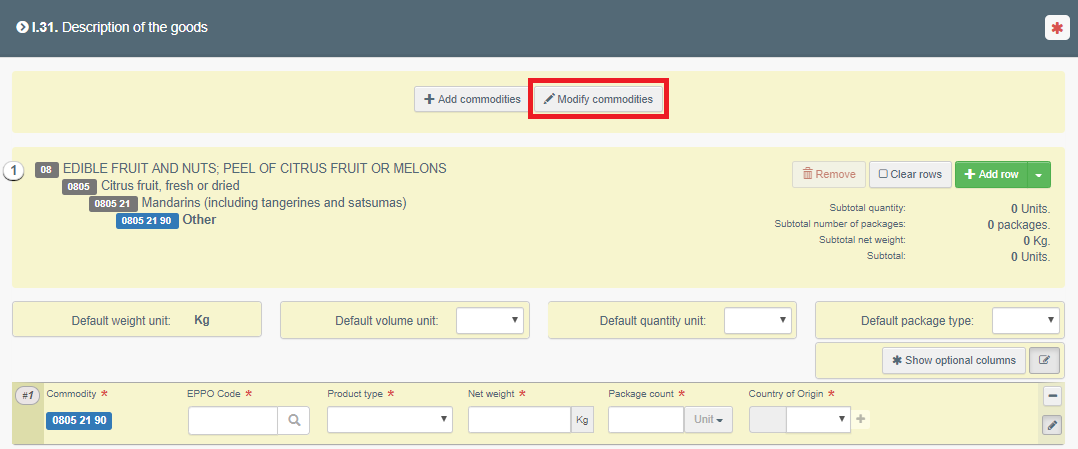
If you need to change the commodity included in the document, click on the button “Modify commodities”.
Note
In box – I.31 Description of the goods, some fields are mandatory, others are not. It is possible to click on the button “Hide optional columns” to show only the fields which must be completed. This will only permit you to see the information that has to be provided to complete the document (EPPO code, Product Type, Net weight, Package count and type of package, Country of origin).


Do not forget to always specify the both unit and the value when you provide the data in the descriptors. An example below:

This tip applies also to the box – I.31 Wood packaging material.
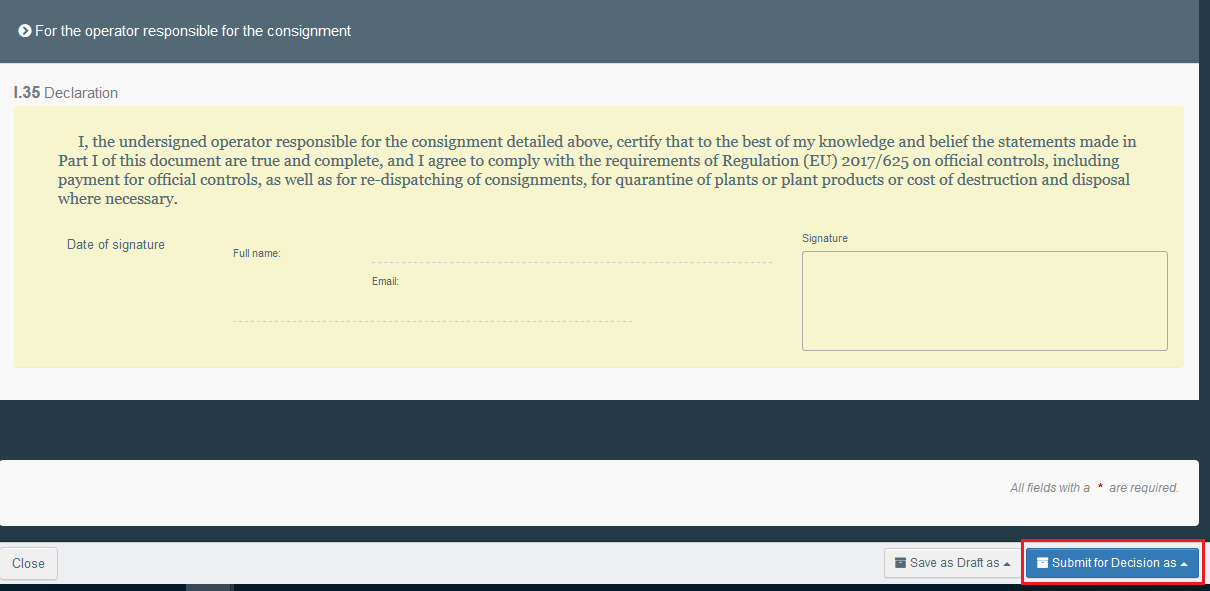
Box – I.35 Declaration: read the declaration, and then click on “Submit for Decision” at the bottom of the page.
Note
If some of the boxes have been completed incorrectly, an “Error” message will appear at the bottom of the page. If you click on the expand sign you will be able to read the message in detail. When you click on each of the messages, you will be redirected to the relevant box and field(s) that require modification.
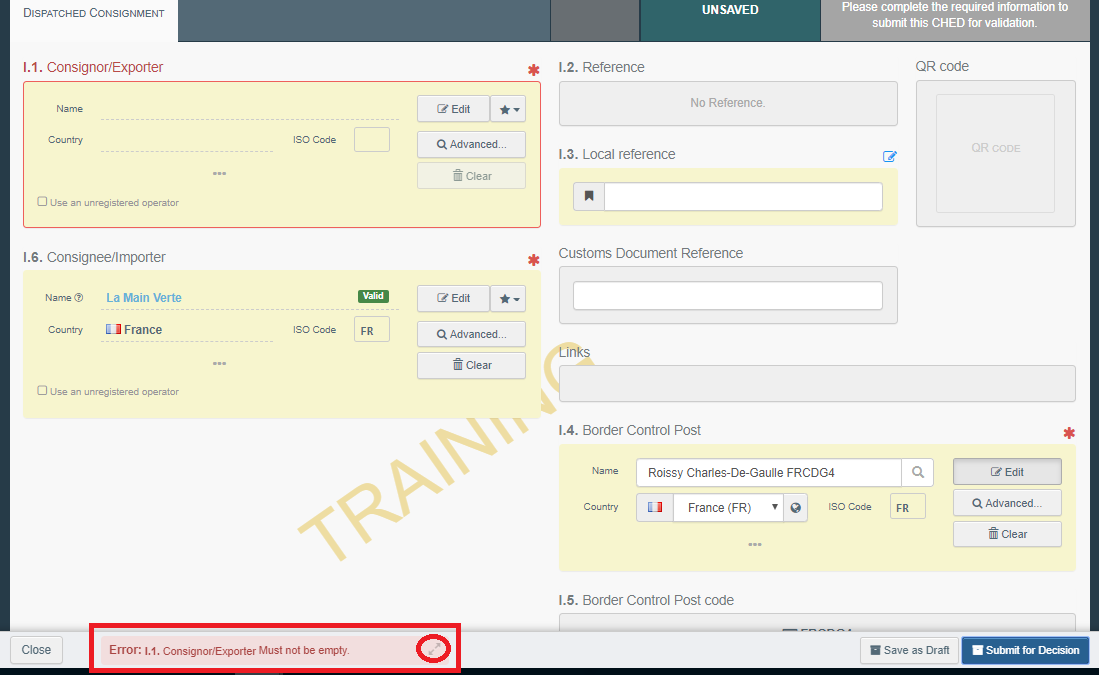
If you filled all the boxes and fields correctly, the message “Submitted for Decision” will appear.
You have successfully completed PART I of the CHED-PP!
Optional boxes:
Box – I.3 Local reference: this number can be assigned by the user themselves, depending on the national administration.
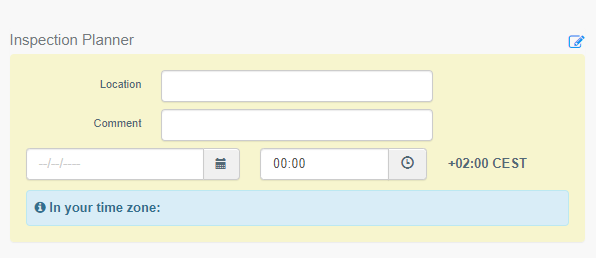
Inspection Planner: It is possible to add details on the inspection such as location, time and other comments in the inspection planner box.
Box – I.17 Container No/Seal No: in this box it is possible to add the Container number and the Seal number. After the checks have been performed, in “Part II - Decision on consignment” of the CHED, the authority can insert a new “Container number for reseal”, if necessary.

Box – I.27 Means of transport after BCP/Storage: use this box to provide details on the means of transport used after the consignment leaves the BCP.
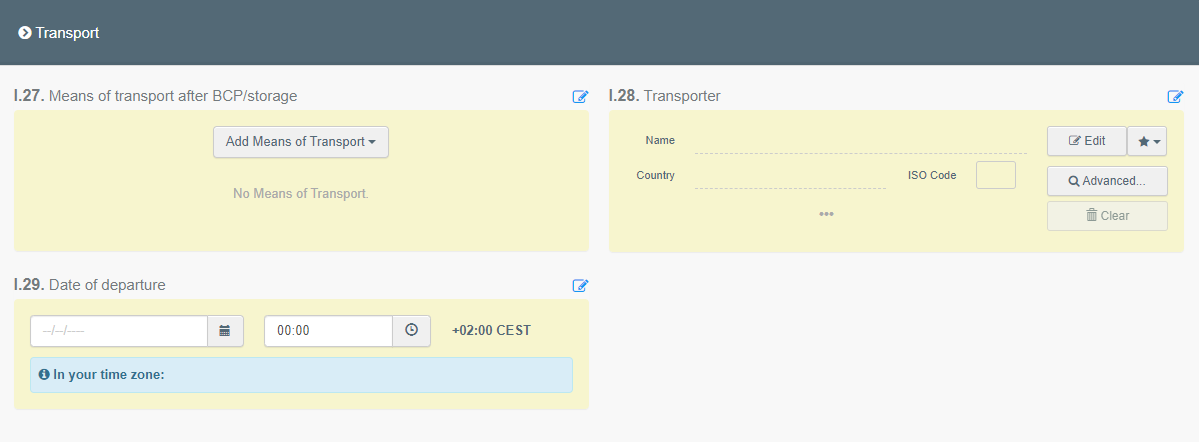
For CHED-PP this box is mandatory for goods subject to transhipment, direct transit, onward transportation and transfer to control point.
Note
If the container number is indicated in Box I.17, the indication of the means of transport is not required.
Box – I.31 Wood packaging material (WPM): To add wood packaging material to the document, click on “+Add wood packaging materials”.

A pop-up window will appear, and it will be possible to select the type of packaging.
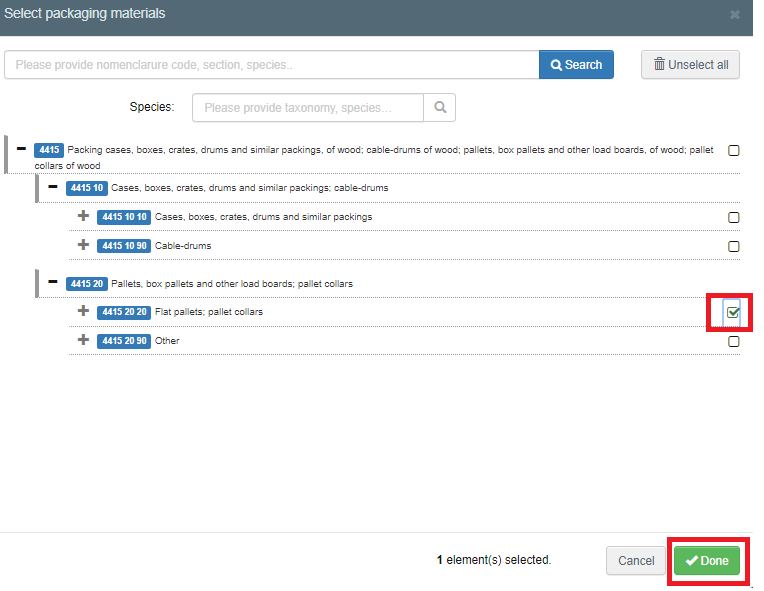
To modify the packaging, click on “Modify packaging materials”.
To manipulate each the WPM included in the document, different options are possible:
Use the button “Remove” to delete the WPM from the list;
Use the button “Clear rows” to delete all the details and information provided for the WPM. Each row can be also independently removed by clicking minus button ( - ) on the right;
Use the button “+ Add row” to add another WPM line.
Note
Some fields are mandatory, others are not. It is possible to click on the button “Hide optional columns” to show only the fields which must be completed. This will ensure an easy visualisation of only the information that has to be provided to complete the document (EPPO code, Count, Country of Origin).
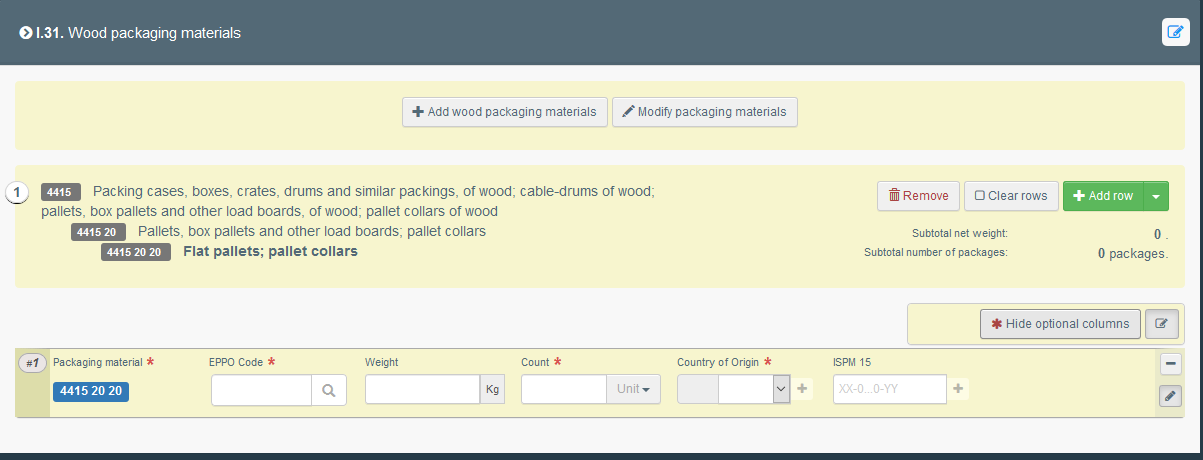
ISPM 15 mark is not a mandatory field in the CHED-PP, but it is still a mandatory requirement under EU law for the import of WPM. Therefore, the fact that you can decide whether to insert the number in the CHED-PP or not, does not mean that the mark itself should not be present on the WPM.
PART II – Decision on Consignment
As Authority
Note
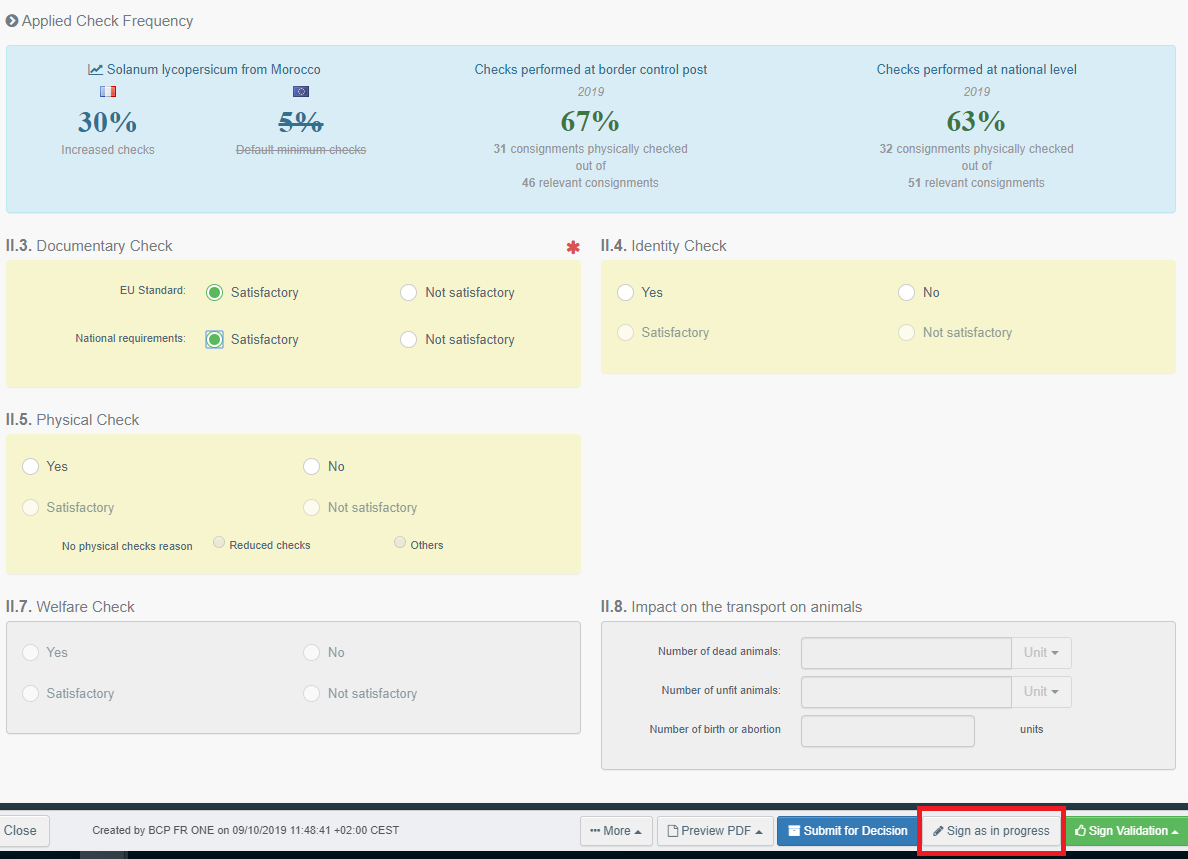
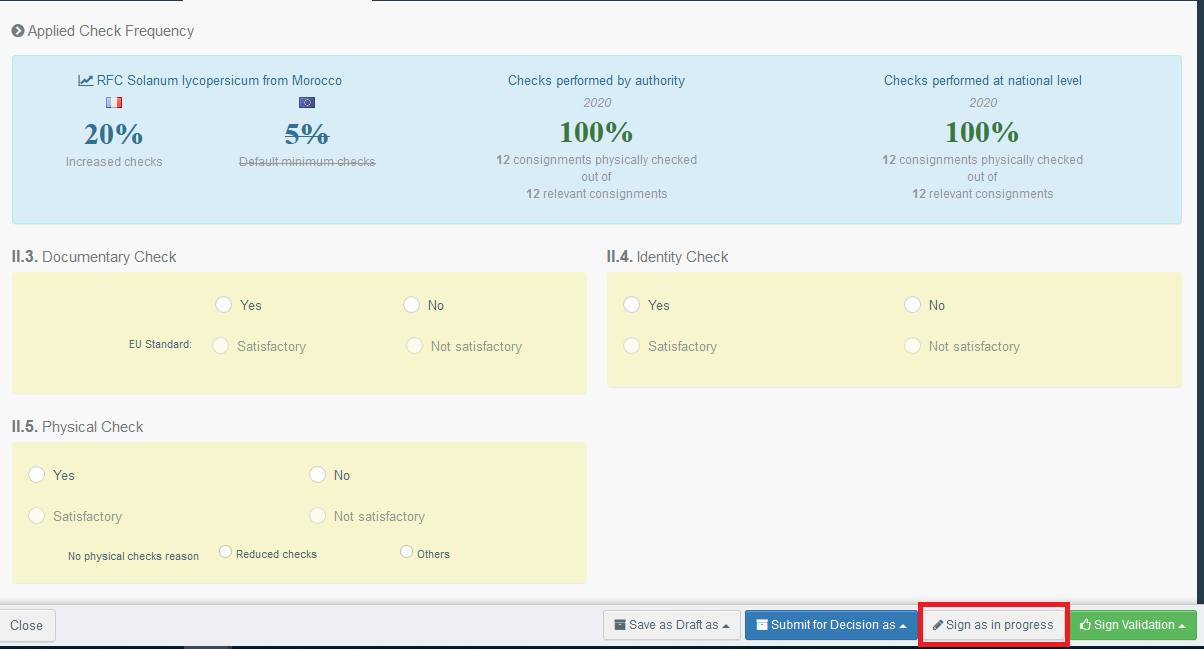
Where appropriate, depending on the commodity chosen and the Country of origin, the system will show the blue box “Applied Check Frequency”.
There, the user will be able to see:
The minimum frequency of checks per specific trade requested at EU level;
If different, the frequency requested at National level (nothing prevents the MS to have a higher frequency than the EU requested for the checks of a particular trade);
The percentage of checks performed at his/her BCP;
The percentage of checks performed at national level.

How to fill in the document?
Mandatory boxes *:
Box – II.3 Documentary Check: if the check has been performed, tick “Yes” and select if the check was “Satisfactory” or “Not Satisfactory”. If the check was not performed, either leave the box empty, or tick on “No”.

At any time, it is possible to use on the document the option “Sign as in progress”. This will save it in the system as it is, in order for the user to modify/validate/reject it later, if necessary. The RFL can still access the CHED-PP but can no longer modify PART I.
Box – II.4 Identity Check: if the check has been performed, tick “Yes” and select if the check was “Satisfactory” or “Not Satisfactory”. If the check was not performed, either leave the box empty, or tick on “No”.
Box – II.5 Physical Check: if the check has been performed, tick “Yes” and select if the check was “Satisfactory” or “Not Satisfactory”. If the check was not performed, either leave the box empty, or tick on “No”. If you tick “No”, specify the reason why the check has not been performed.
Note
Boxes – II.4 and II.5 become mandatory when “yes” or “no” is ticked. Therefore, if you selected “yes” it will be necessary to specify whether the check performed was satisfactory or not.

Boxes – II.9/II.11/II.12/II.14/II.15/II.16 Conclusion: Depending on the result of the checks, in boxes – II.9/II.11/II.12/II.12/II.14/II.15/II.16 Conclusion” click on “Accept”, “Partially Reject” or “Refuse”.
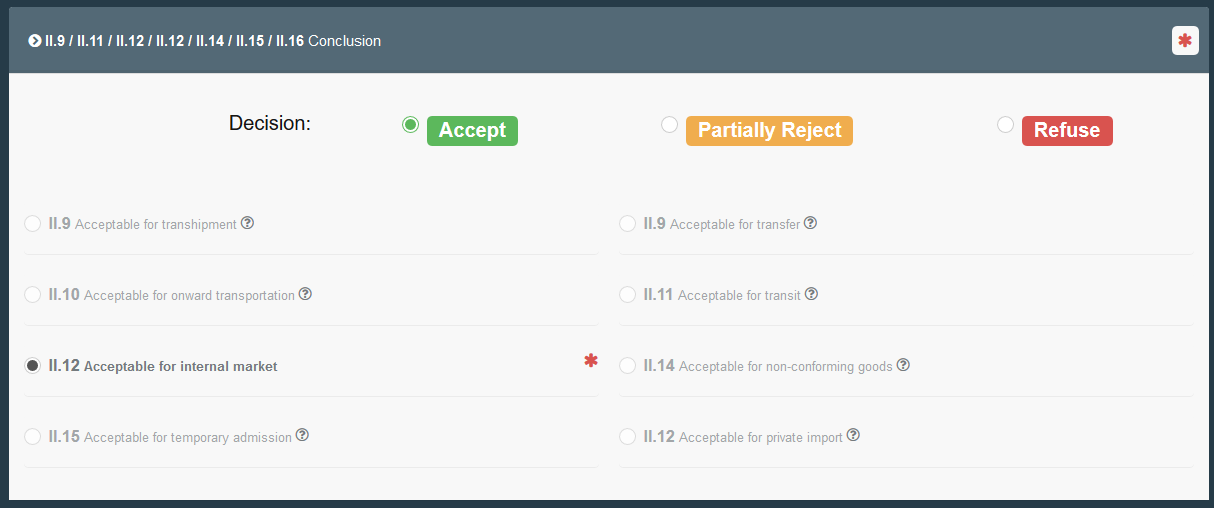
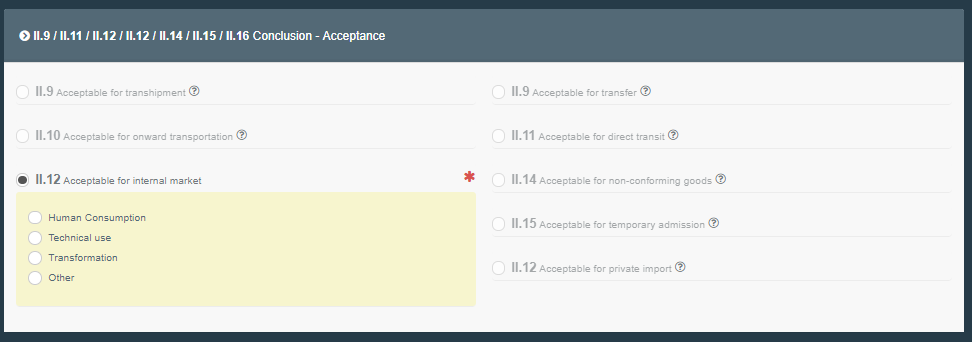
Box – II.12 Acceptable for internal market is automatically ticked when box – I.23 Internal market is selected in PART I and when “Accept” is selected. To finalize the CHED-PP, once the checks have been marked as “Satisfactory” or “Not Satisfactory”, and depending on how the Box “Conclusion” has been filled in, it is possible to click either on “Sign Validation”, or to “Submit for Partial Rejection” or “Sign Rejection” at the bottom of the page.
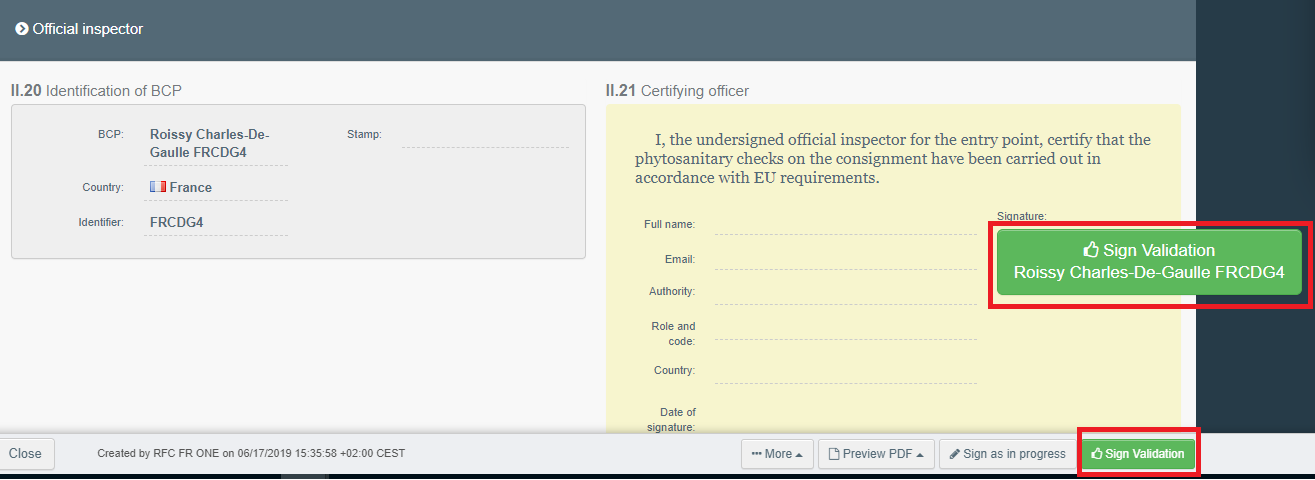
Sign Validation: when all the checks performed are “Satisfactory” and all the mandatory fields are completed, click on Sign Validation and the CHED-PP will be finalised with the status “Validated”. The document is ready to be printed, stamped and signed.
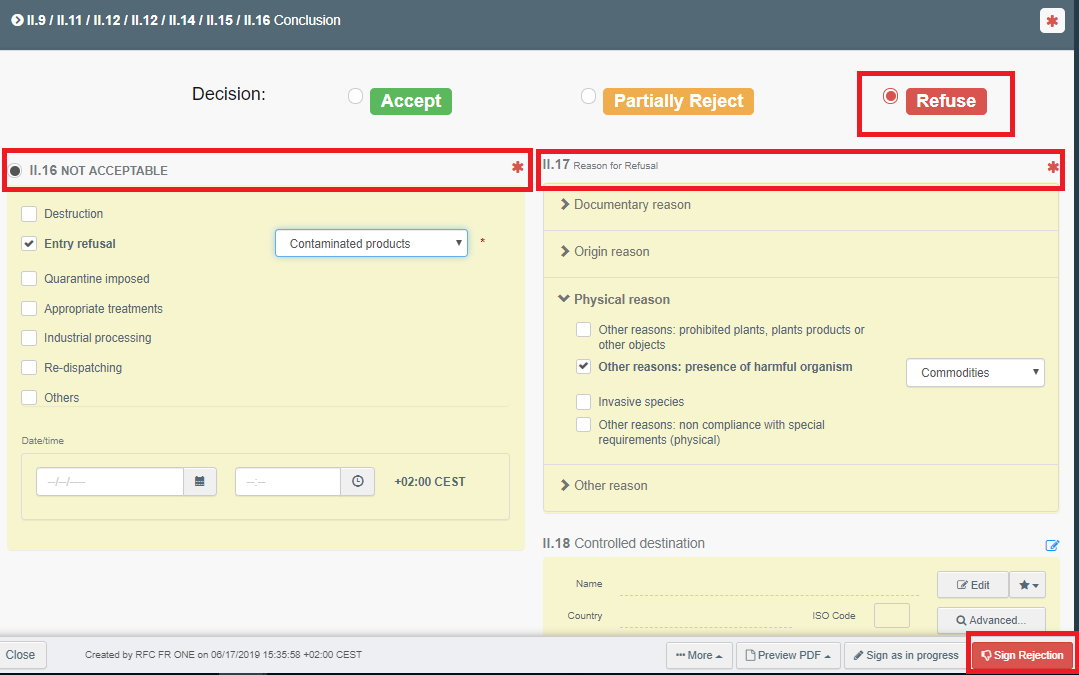
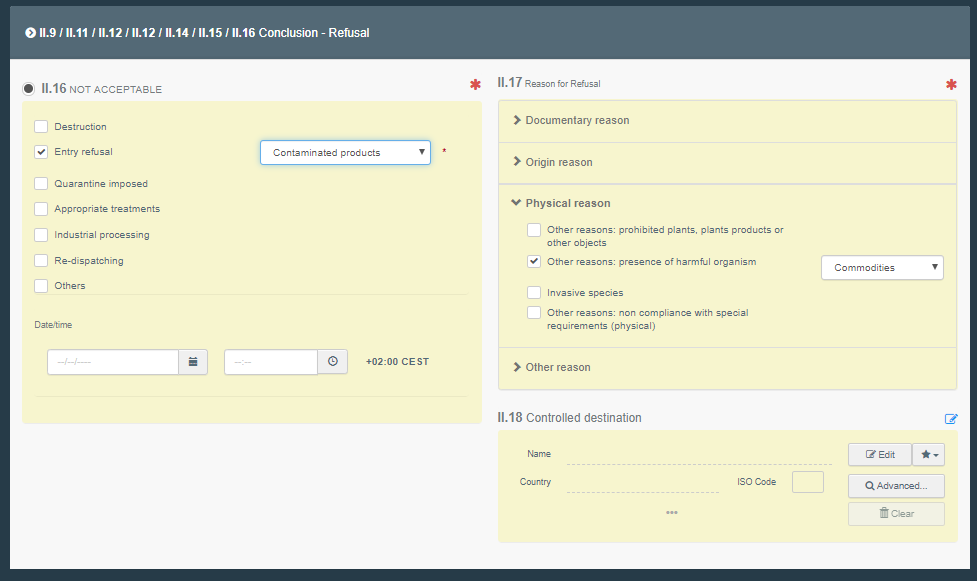
Sign Rejection: When some of the checks performed are “Not Satisfactory” and the option “Refuse” in boxes – II.9/II.11/II.12/II.12/II.14/II.15/II.16 Conclusion is selected, boxes – II.16 Not Acceptable and II.17 Reason for refusal become mandatory.
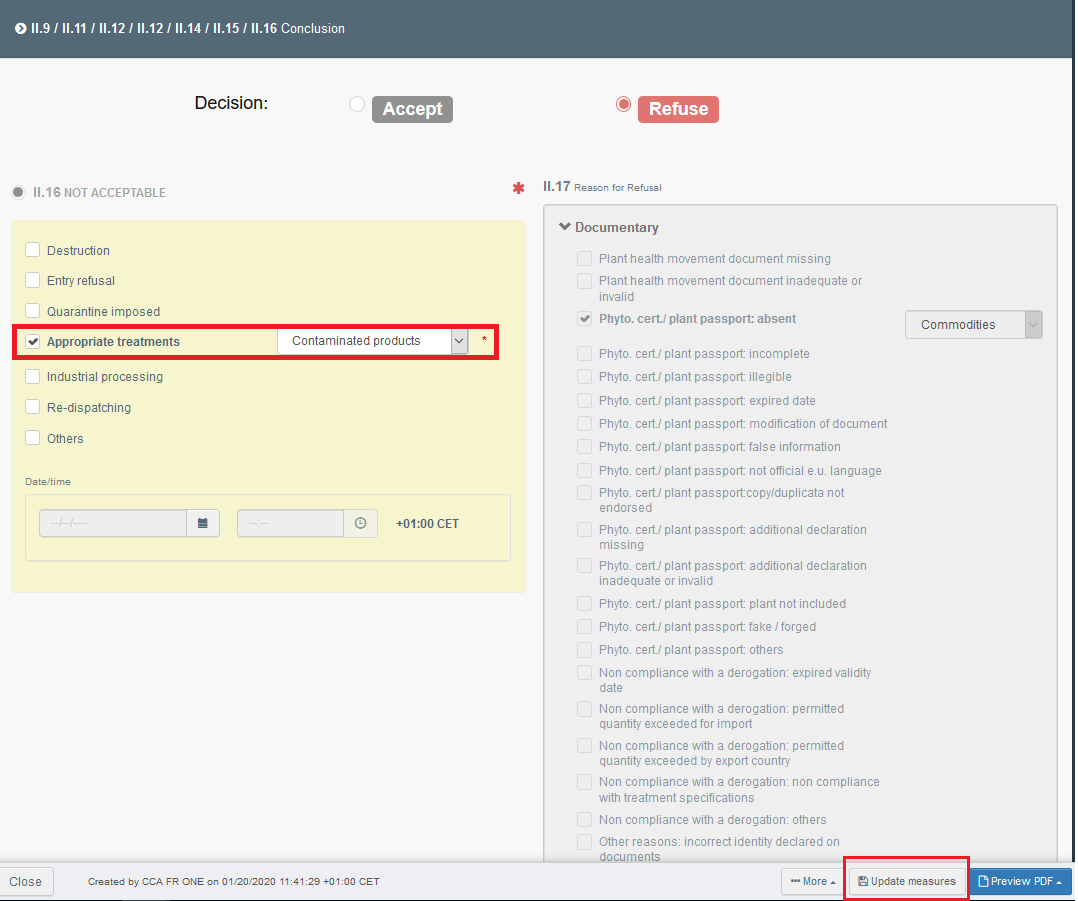
In box – II.16 it is necessary to specify the measure to be adopted after the rejection. Select among the options in the list and specify on which part of the consignment the measure that is applicable.
In box – II.17 it is necessary to specify the reason for refusal among the options provided in the list, and to specify on which part of the consignment they refer to.
Once these two Boxes are filled in, it will be possible to use the option “Sign Rejection”, finalising the CHED-PP which will have the status “Rejected”. The document is ready to be printed, stamped and signed.
Note
You can modify reasons for refusal with no time limit.
It is possible to update the measure selected in box – II.16 after the CHED-PP has been rejected, with no time limit.
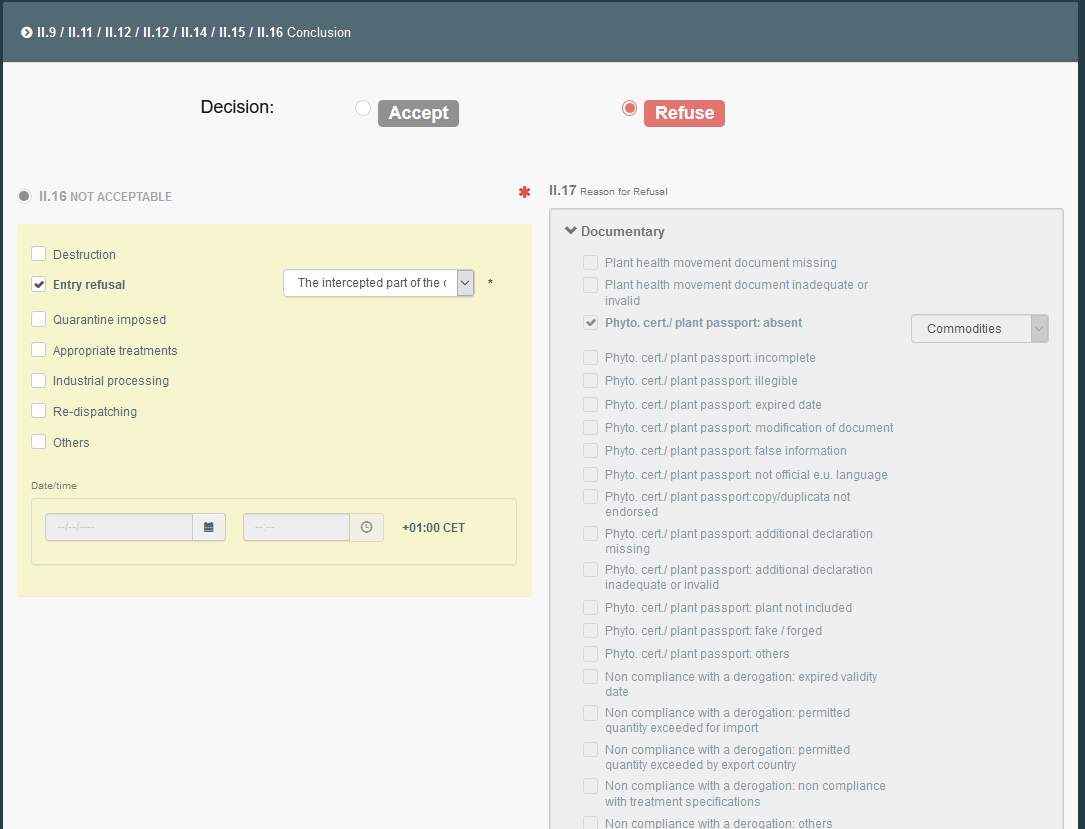
The box remains editable after the CHED-PP has been signed for Rejection. Therefore, it is possible to access the CHED-PP and modify the measure. To confirm the modification and update the PDF, click on the button “Update measure” at the bottom.
Submit for Partial Rejection
The option “Partial Rejection” allows to reject only a part of a consignment.
In PART II of the CHED-PP, do not complete boxes – II.3 Documentary check, II.4 Identity check and II.5 Physical check: the results will be completed in the Partial Rejection screen.
Note
There is no possibility to Sign as in progress the Partial Rejection. Therefore, start completing the partial rejection only when you are sure to finish the workflow.
In box – II.9/II.11/II.12/II.12/II.14/II.15/II.16 Conclusion, click on the orange button “Partially Reject”.

At the bottom right of the page, click on “Submit for Partial Rejection”. A new screen will appear where three tabs are displayed:
“Commodities selection”
“Decision on Accepted Consignment”
Decision on Rejected Consignment
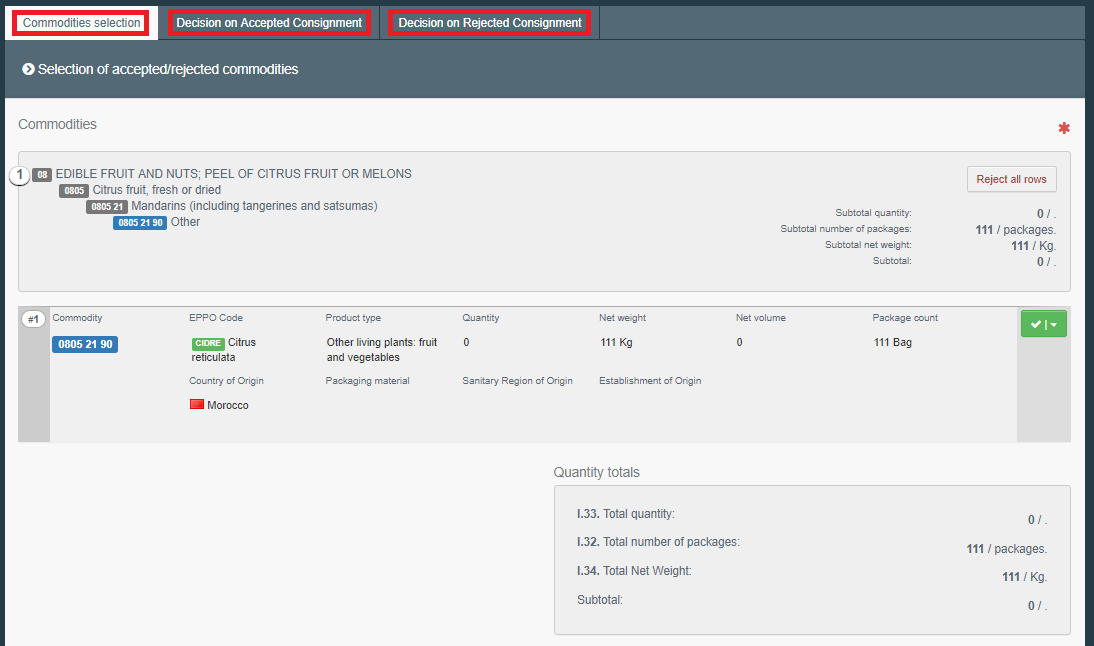
If there is only one commodity in the CHED-PP, and part of it should be rejected, in the “Commodities Selection” Tab, the user can click on the green button on the right and select “Partially Reject”.

The system will allow the user to modify the values of “net weight” and “package count” (and Quantity and Net volume if provided) which had been added in PART I. Here the user can type the quantity that is intended to BE REJECTED.

If there is more than one commodity in the CHED-PP, it is possible either to reject an entire commodity line (click on “reject all rows”), or part of it or part of both (click on the green button ➔ partially reject).
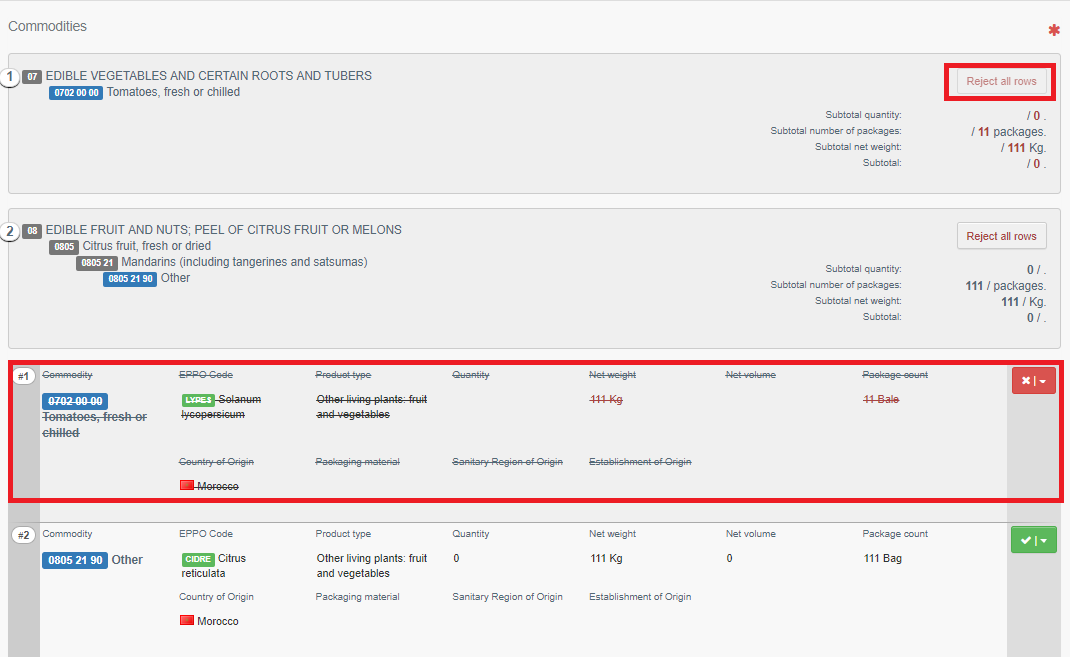
The same procedure is applicable when there is WPM in the CHED-PP, and all or part of it should be rejected.

The field entitled “Quantity totals” is dynamic, and changes according to the modifications made in the commodity line.
Once the “Commodities Selection” is completed, the Tab “Decision on Accepted Consignment” needs to be filled in. In the box – I.31 Description of the goods, the system will show the part of the consignment which will be ACCEPTED.
Note
Boxes – II.3, II.4 and II.5 must be completed and, as this part of the consignment is the one to be ACCEPTED, all the checks must be SATISFACTORY.
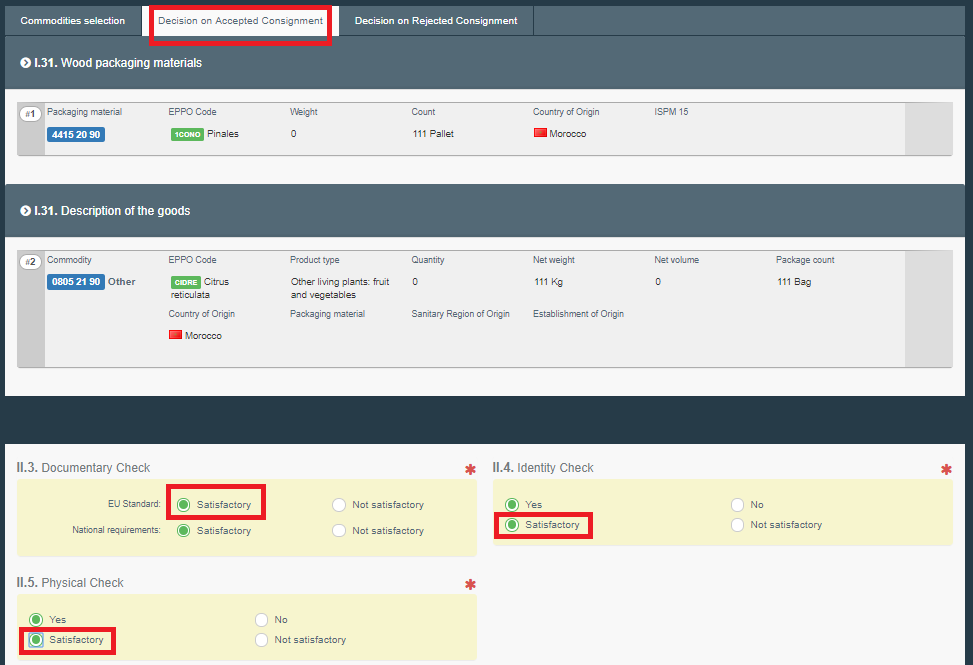
Once the Tab “Decision on Accepted Consignment” is completed, the Tab “Decision on Rejected Consignment” needs to be filled in. In the box – I.31 Description of the goods, the system will show the part of the consignment which will be REJECTED.
Note
Boxes – II.3, II.4 and II.5 must be completed and, as this part of the consignment is the one to be REJECTED, at least one of the checks must be NOT SATISFACTORY.
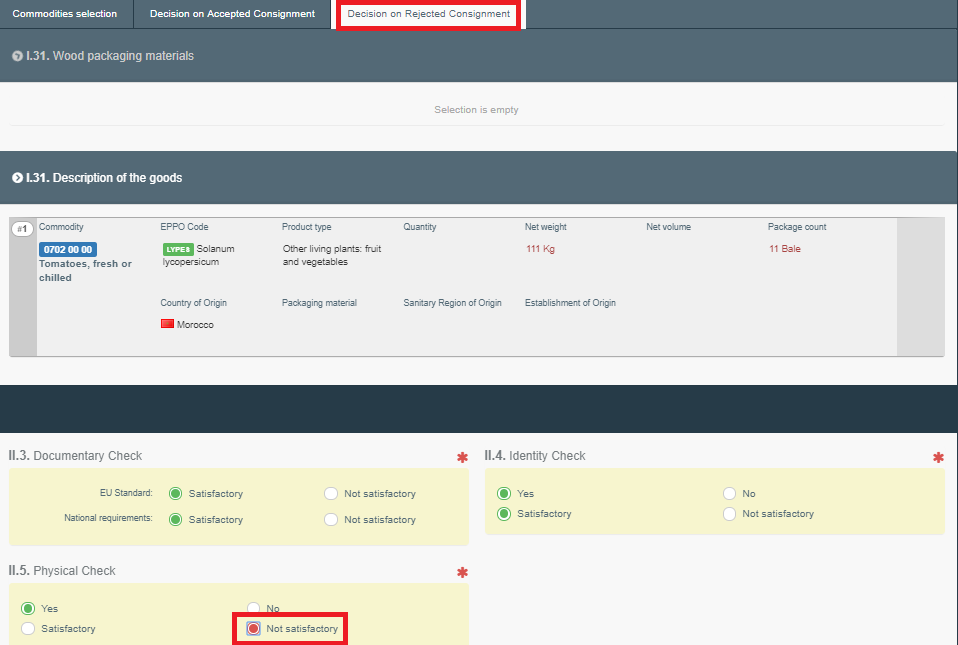
Both “Decision on Accepted Consignment” and “Decision on Rejected Consignment” work as PART II of the CHED-PP, therefore all the mandatory fields must be completed (boxes – II.3, II.4, II.5, II.9/II.11/II.12/II.12/II.14/II.15/II.16) to finalise the document.
For the Tab “Decision on Accepted Consignment” it will be:
For the Tab “Decision on Rejected Consignment” it will be:
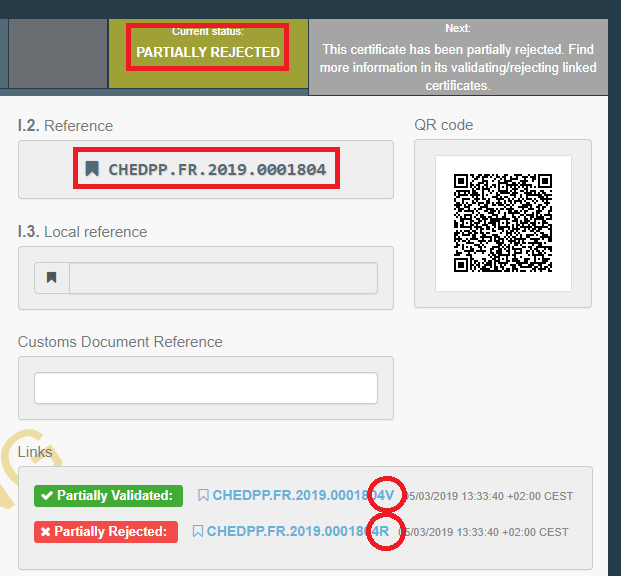
When all the Tabs are completed and all the mandatory fields are filled, the user can click on the green button “Sign Partial Rejection” on the bottom right. This action will generate two different CHED-PPs, one for the Accepted part of the consignment, and one for the Rejected part of the consignment. Both these new documents will be linked to the initial CHED-PP, which contains the details on ALL the consignment.
The initial CHED-PP will have the status “Partially Rejected”.
The CHED-PP for the accepted part of the consignment will have the status “Validated” and it will have a “V” at the end of the TRACES reference number.
The CHED-PP for the rejected part of the consignment will have the status “Rejected” and it will have an “R” at the end of the TRACES reference number.
You have successfully completed PART II of the CHED-PP!
Optional boxes:
Box – II.6 Laboratory tests: this box needs to be filled in only if a physical check was performed.

If a Laboratory test has been made, click on “+Add laboratory test”.
Select the commodity on which it has to be/has been performed:

Provide the data required (taxons, category and Laboratory test):
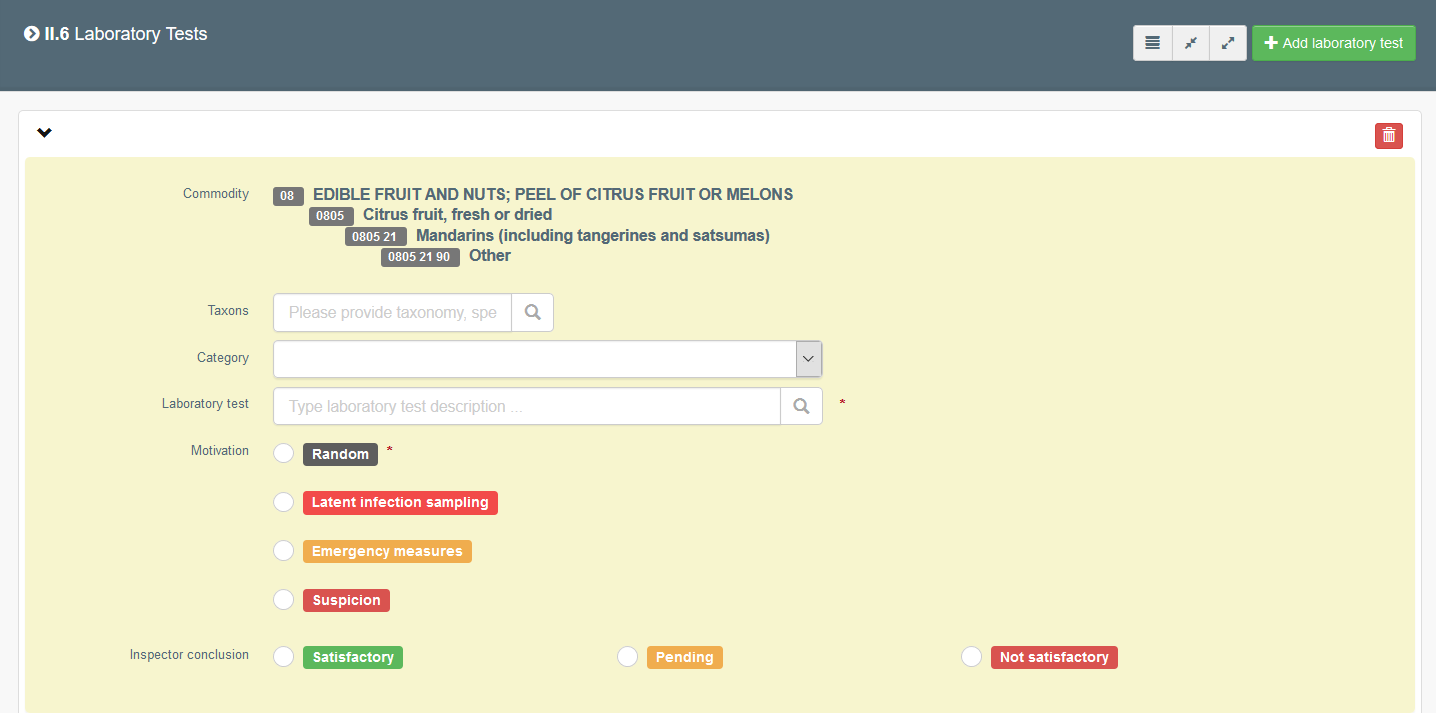
Choose the Motivation of the test:
“Random” check;
“Latent infection sampling”, where sampling is required in accordance with Union law and the consignment is not detained at the BCP pending test results;
“Emergency measures”, where animals and goods are under specific emergency measures and are detained at the BCP pending test results;
“Suspicion”, where animals and goods are suspected of not complying with Union law and are detained at the BCP pending test results;
Indicate the Inspector conclusion by selecting among “Satisfactory”, “Pending” or “Not Satisfactory”.
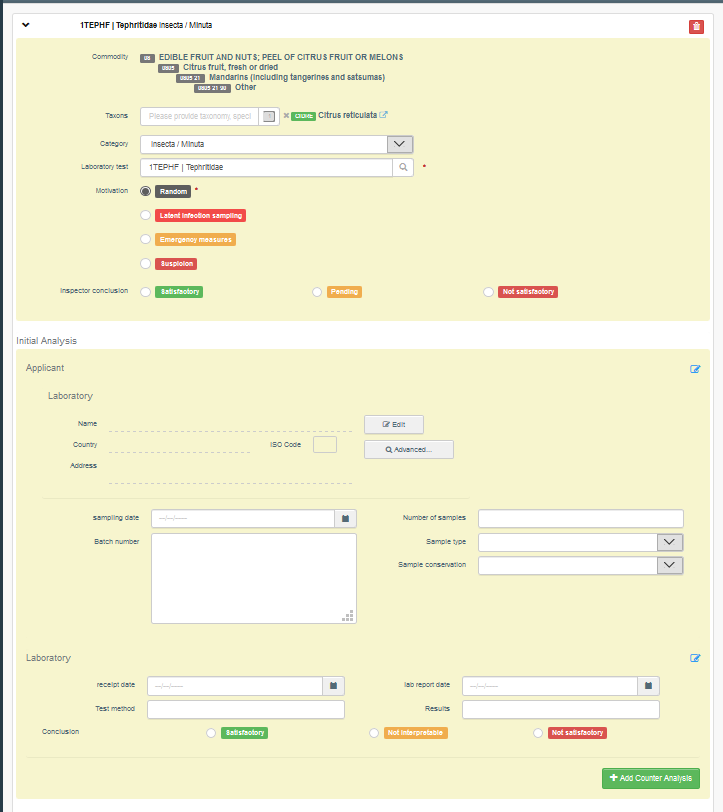
In the “Applicant” box, it is mandatory to specify the Laboratory. To do so, insert the name, country and address of the Laboratory. When starting typing the name, it is possible to select it from the drop down list that appears. Alternatively, it is possible to run an advanced search inserting the proper filters. It is also mandatory to specify the “Sample date”, the “Sample use date” and the “Released date” and the Lab Conclusion, which can be “Satisfactory”, “Not interpretable” or “Not Satisfactory”. The other fields are not mandatory.
Eventually, it is possible to “+Add Counter Analysis”.
Note
When a Laboratory test result is marked as “pending”, in boxes – II.9/II.10/II.11/II.11/II.12/II.13/II.14/II.15 Conclusion the option “Acceptable for Onward Transportation” will become selectable.
This would be the case when, despite a pending Lab Test result, the consignment is authorised to move to an “Onward Transportation Facility”. Once the consignment arrives at the OTF, a subsequent CHED will be generated and the RFL will complete PART I. The authority responsible for the OTF will acknowledge the arrival of the consignment at the OTF by filling in PART III of the first CHED.
The Authority of the first CHED, which has performed the Lab Tests, will complete PART II of the subsequent CHED, will insert the results of the tests and will finalise it by validating or rejecting it.
What if you have to wait for the result of Lab tests and do not want to lose any progress made in the CHED-PP?
When this is the case, in the “Inspector conclusion” box of the Lab test, select “Pending”. Sign the document as “In progress”. When the lab test results will be ready, you will be able to access the CHED-PP “In progress”, update the part on Lab tests, and finalise the document with your decision on the consignment.
What if you need to validate/reject the CHED-PP before the Lab test results are available?
When you select “Random” in the “Motivation” box of the Lab test, you select “Pending” in the “Inspector conclusion box” and you can validate/reject the CHED-PP.
When you select “Suspicion” in the “Motivation” box of the Lab test, you select “Pending” in the “Inspector conclusion box” you can only reject the CHED-PP.
When the Lab test result will be available, you access the validated/rejected CHED-PP and you update the Lab result Box. To save the modification, you click on “Submit laboratory test” and the CHED-PP will be updated with the results. The number of the Document will remain the same.

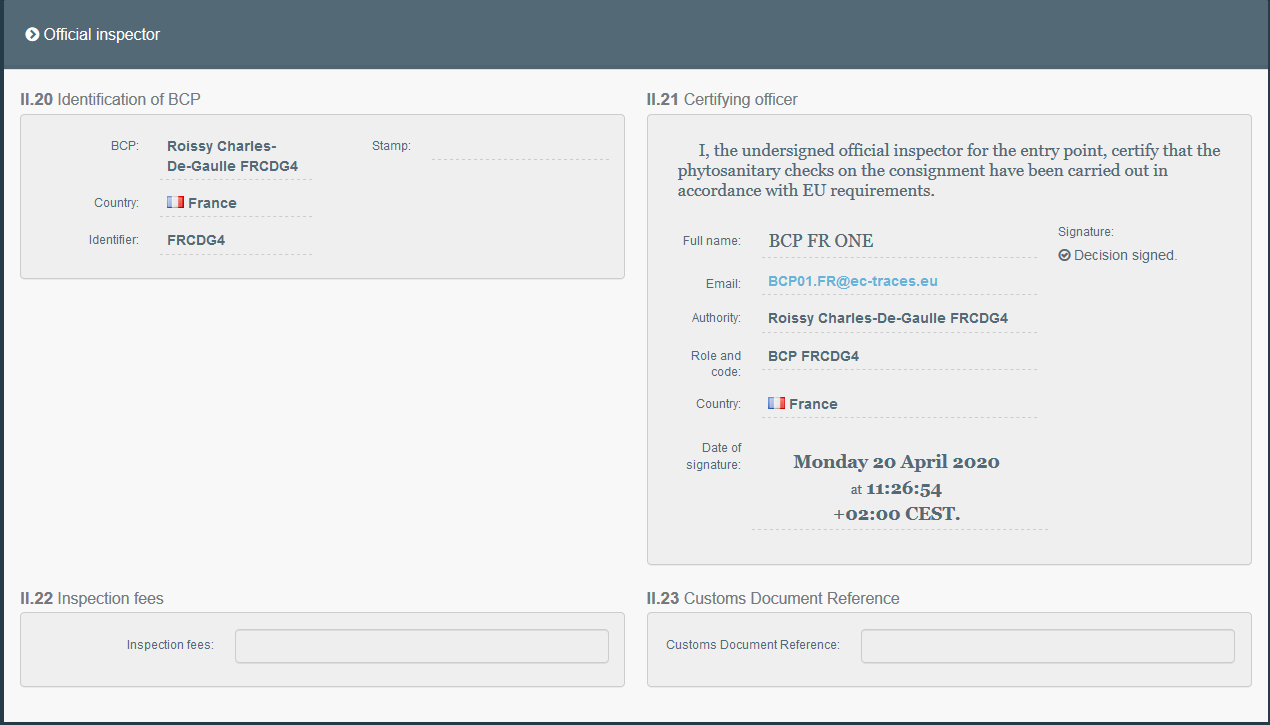
Box –Official Inspector:
Box – II.20 Identification of the BCP: this Box will be automatically filled in with the information about the authority which completed PART II, after the validation/rejection of the document.
Box – II.21 Certifying officer: this Box will be filled in with the information about the inspector who signed the validation/rejection.
Box – II.22 Inspection fees: type the inspection fees.
Box – II.23 Custom Document Reference: This is a free text Box and it is not mandatory.
Create a CHED-PP for WPM
To create a CHED-PP that only contains WPM, you have three options, depending on the case:
A. You have to create a CHED-PP for WPM accompanying commodities of which you have information;
B. You have to create a CHED-PP for WPM accompanying commodities of which you do not have information;
C. You have to create a CHED-PP for WPM, as commodity.
A. You have to create a CHED-PP for WPM accompanying commodities of which you have information
When you create a new CHED-PP, select in the pop-up window the option “Other than plants or plant products”
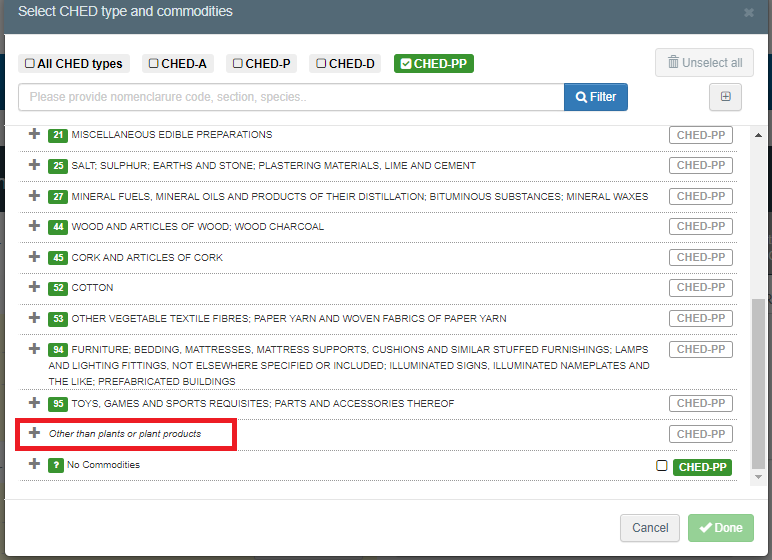
You will find there a list of Chapters of CN codes that are not related to plants or plant products:
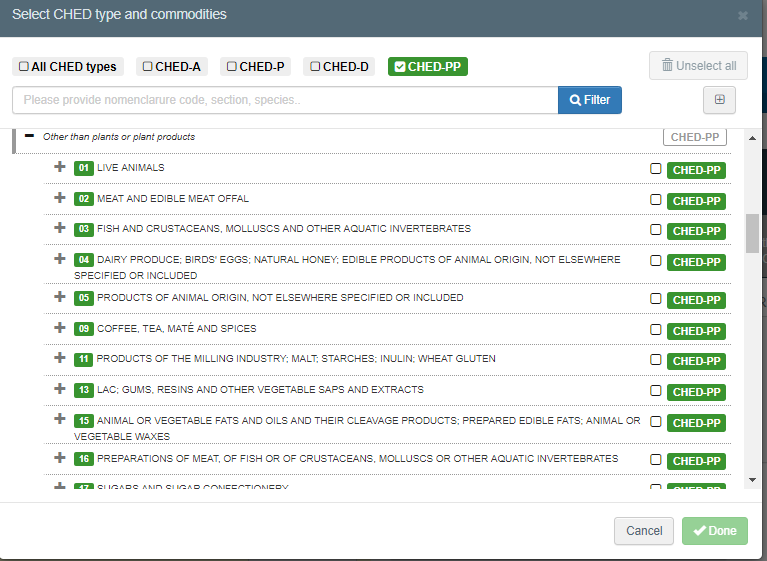
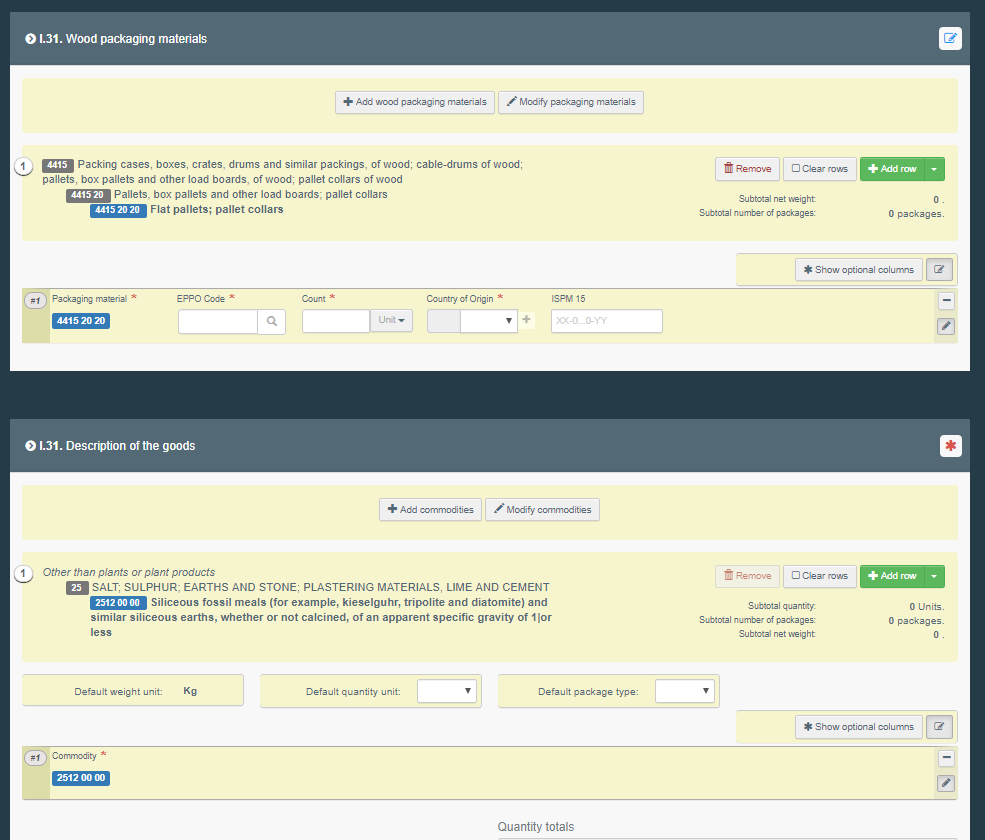
When you select the option “Other than plants or plant products”, at the commodity level (box I.31 – Description of the goods), you will not have the possibility to complete the information.
Then add the WPM in box – I.31 – Wood packaging material and the Checks performed and registered in PART II will refer only to the WPM.
Your CHED-PP will look like this:
B. You have to create a CHED-PP for WPM accompanying commodities of which you do not have information
When you create a new CHED-PP, select the option “No commodities” in the pop-up window:
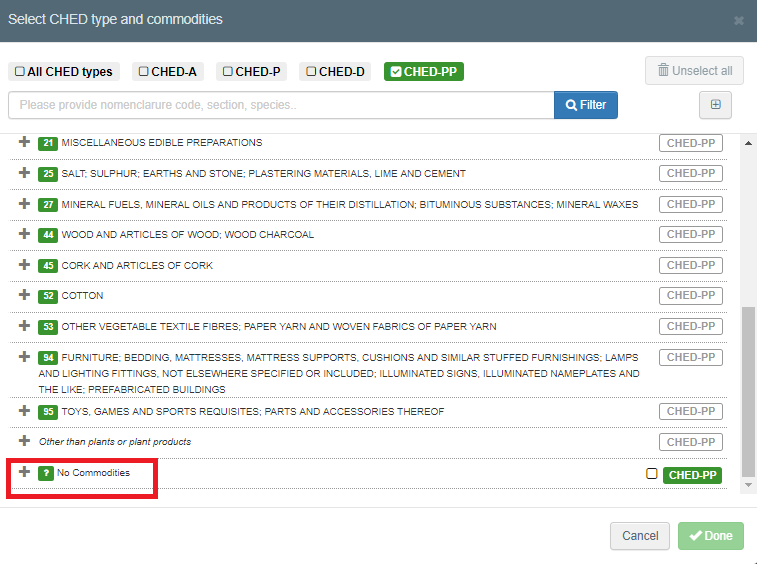
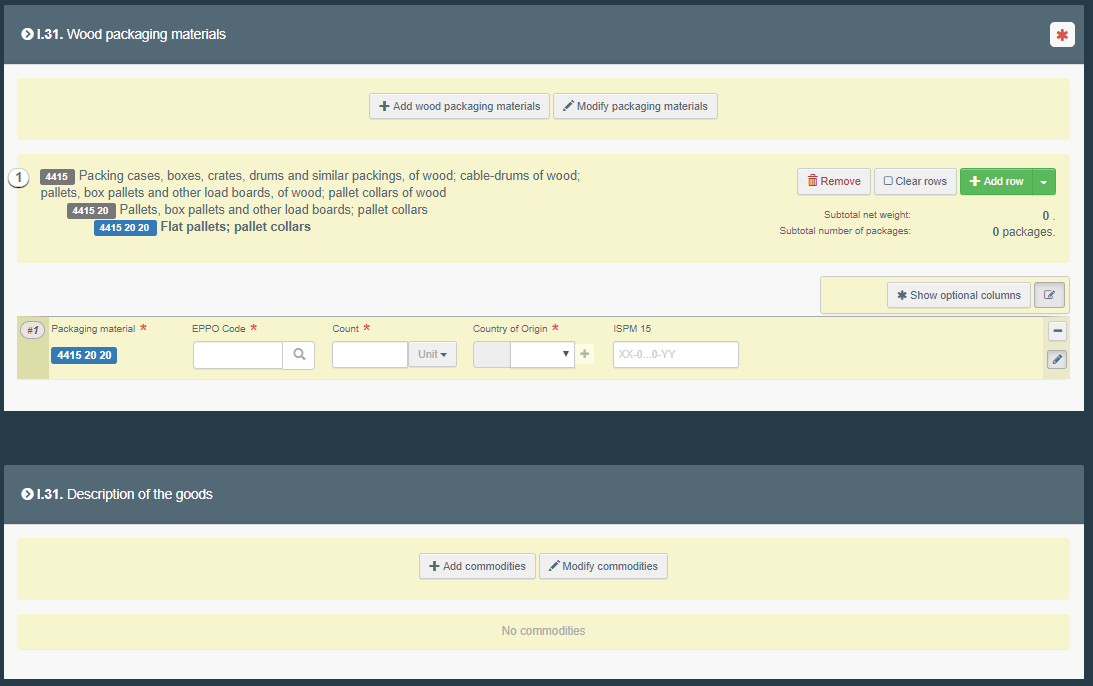
When you select “No commodities”, at the level of box – I.31 – Description of the goods, you will have an empty box.
Add the WPM in the proper box – I.31 – Wood packaging material. Your CHED-PP will look like this:
C. You have to create a CHED-PP for WPM, as commodity
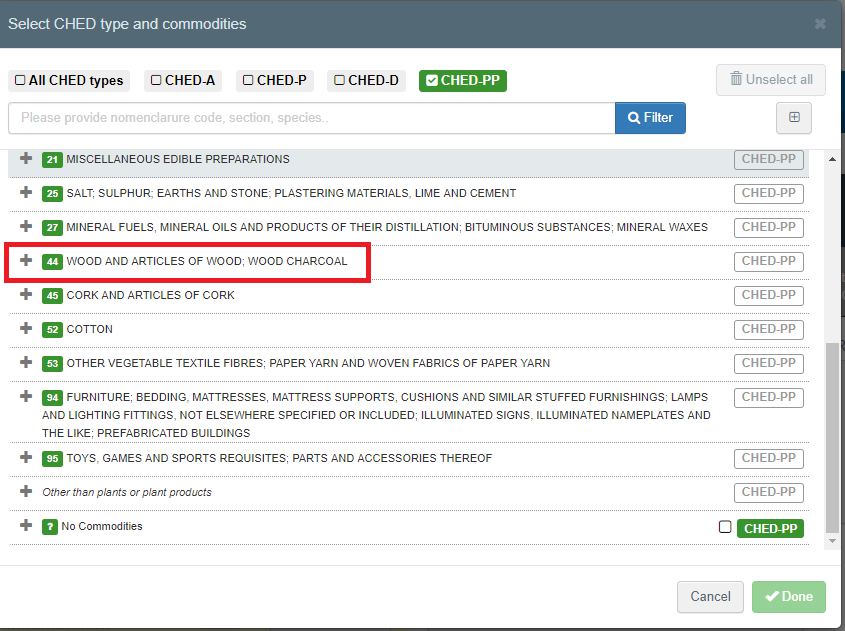
When the WPM itself is the commodity, select the proper CN code from the list in the pop-up window:
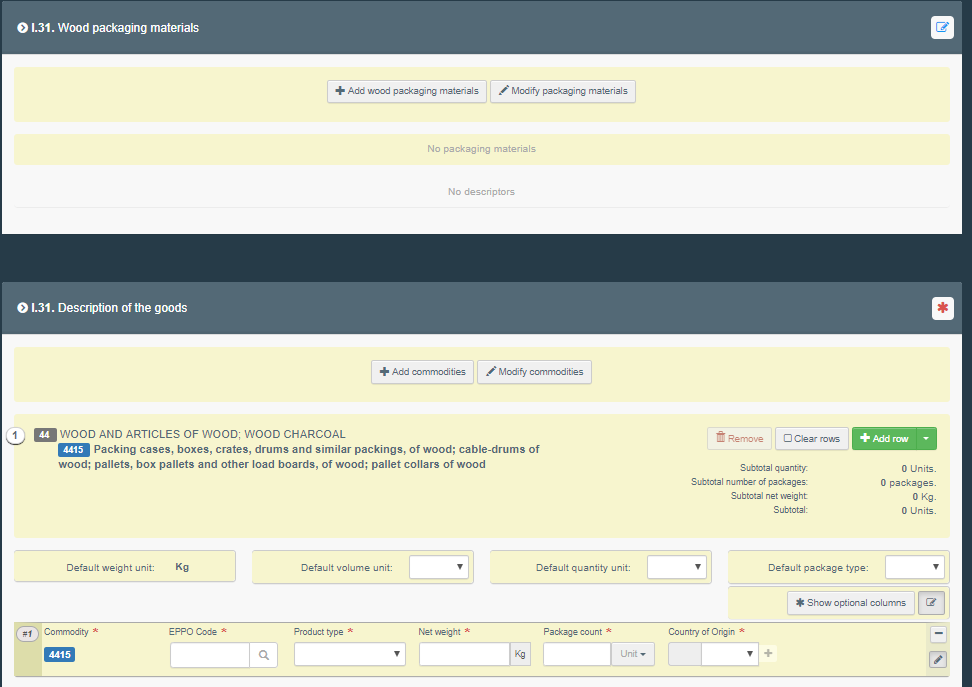
At the level of box – I.31 – Description of the goods, you will find the CN code that you selected and your CHED-PP will look like this:
In all three cases, you will then proceed normally to the completion of the data requested, and finalise the document on WPM.