
Participant Register
User's Guide
Version
January, 14th 2021
| HTML |
|---|
<div id="page-break-after"></div> |
Table of content
| Table of Contents | ||||||||||
|---|---|---|---|---|---|---|---|---|---|---|
|
PARTICIPANT REGISTER – The Registration Process
Introduction
| Multiexcerpt | |||||||||||||||||||||||||||||||||||
|---|---|---|---|---|---|---|---|---|---|---|---|---|---|---|---|---|---|---|---|---|---|---|---|---|---|---|---|---|---|---|---|---|---|---|---|
| |||||||||||||||||||||||||||||||||||
The Participant Register is an online web interface offering registration and data update services for participants via the Funding & tenders Portal. - register their organisation in order to participate in EU-funded funding and tender opportunities - manage their organisational data
|


Navigation
| Multiexcerpt | ||
|---|---|---|
| ||
Navigating in the initial 'metroline' registration wizard When logging in to the Participant Register through the Funding & Tenders Portal and starting the organisation data's update process, a new tab will open in your browser enabling you to access the update page. The registration process finishes on completion of six steps which follow a logical sequence: Welcome, Identification, Organisation, Contact, Summary and Success. During the identification step, 2 of the registration process, the wizard applies a heuristic method to automatically detect organisation duplicates. This is a summary of the different elements found in each screen of the wizard:
|


| Multiexcerpt | ||
|---|---|---|
| ||
Navigating in the Data update page The modify registration process consists of a set of data input fields and selection lists organised thematically on a page. Numerated items ranging from 1 to 4 (see image below) are applicable for the data update tool regardless of the status of your PIC. Numerated items ranging from 5 to 6 are only applicable, and visible, if the status of your organisation is 'valid', or your organisation is undergoing a validation process
Also notice that, when having submitted a change, both the changed value pencil icon (6) and the Submit changes button (4), shown above, will display as 7 and 8 respectively, as seen below. Item 7 is applicable for validated organizations, whereas 8 is applicable regardless of the status of your PIC.
When clicking the icons (no matter if it is a green tick or a yellow/red pencil), the "Current declared value" and "Last validated value" will be displayed in a pop-up window.The current declared value corresponds to the value of the field which is currently declared or which has recently been modified by the self-registrant/LEAR of the organisation.
|


Roles and Access Management
| Multiexcerpt | ||
|---|---|---|
| ||
Roles and Access rights management is a process you need to take care of at different moments during the funding life cycle in the different IT applications you will use to manage the grant agreement or contract. In relation to your organisation registration, it mainly refers to granting access to different people in your organisation so that they can access your organisation data in Participant Register.
You can read all about Roles and Access rights here. If you wish to be allocated a role, but you do not know who from your organisation is the contact person in Participant Register, you can use the Contact Organisation functionality in the portal to send a message: If the organisation is not listed under My organisations because you did not use it yet: perform a search for the organisation, and then select Actions / contact organisation.
If the organisation is already listed under My organisations in the portal, go to My Area/ My organisations, and select contact organisation under the Actions button menu.
Allocating Roles Depending on whether your organisation has been validated or not, there is a specific role that you are strongly advised to allocate to additional people in your organisation: Declared organisations When your organisation did not undergo a validation process yet, the only role available is Self Registrant. The person who has registered the organisation is granted this role automatically. You are advised to nominate at least one additional self registrant. This will prevent that the access to the organisation data is lost if the person who originally registered is unavailable. To nominate an additional self registrant in the Funding & Tenders Portal, go to Manage my area / My Organisation(s), click on the Actions button next to your organisation, and select Manage roles.
Click on Add Roles int he following screen. Then, select the role Self Registrant and enter the first name, surname and email address of the person. Click on OK to confirm. As from that moment, the nominated person will see and may access this organisation under her/his My Organisation(s) section within the Manage my area from the Portal. If the person does not have an EU Login, he/she will be invited to register.
Validated organisations There is a main role when the organisation has been validated: LEAR. When a LEAR has been validated, all the previous self registrant roles are revoked, and only the LEAR will have access to the organisation data. It will not be possible to allocate self registrant roles any more, but the LEAR can appoint Account Administrators. This kind of role can perform the same actions as a LEAR in the Participant Register.
To nominate an Account Administrator in the Funding & Tenders Portal, go to Manage my area / My Organisation(s). Then, click on the Actions button next to your organisation, and select View roles.
In the Following screen, click on Edit Organisation Roles, and click then on the Add Roles button. Select the role Account Administrator and enter the first name, surname and email address or the person. Click on OK to confirm.
As from that moment, the nominated persons will see and may access this organisation under their My Organisation(s) section within Manage my area from the Portal. If the person does not have an EU Login, he/she will be invited to register. |


Contact and Support
| Multiexcerpt | ||
|---|---|---|
| ||
Contact & Support Select the Support/ Helpdesks menu in the Funding & tenders portal.
Click on the It Helpdesk icon to report any problem related to the Participant Register application. This will open contact form where you can enter the details of the problem. If you have already registered your organisation and you need to contact Validation Services, use the Messages section within the Participant Register data update page for your organisation.
Note Procurement: please, visit the e-PRIOR wiki where you will find specific Procurement specific FAQs, as well as the contact details for both Supplier Portal and Procurement support. |


How to register an organisation?
Accessing the Participant Register
| Multiexcerpt | ||
|---|---|---|
| ||
Note Procurement: To access the Participant Register you need to access the PIC-Management module within the Supplier Portal. Please, visit the e-PRIOR wiki for detailed information: https://webgate.ec.europa.eu/fpfis/wikis/x/R6VGC Go to the Funding & tenders Portal: https://ec.europa.eu/info/funding-tenders/opportunities/portal/screen/home
From the How to participate menu on the top, select Participant Register.
To make sure that your organisation has not already been registered in the Participant Register, search for organisations by clicking
|


Participant Register - Wizard Welcome
| Multiexcerpt | ||
|---|---|---|
| ||
In the first page of the Registration Wizard you can read some useful information on the registration process. If you did not complete your registration in a previous session, you will also see a message "Continue your existing registration?" in the middle-lower part of the screen. The application will allow continuing with the previous registration draft by clicking the Click on the
How to continue with a previous registration  Discarding the previous draft registration:
You will be requested to confirm that you want to delete the previous registration draft by clicking on theSubmitbutton.
|


Identification (Duplicate check)
| Multiexcerpt | ||
|---|---|---|
| ||
Enter Identifiers The Registration Wizard needs to detect if the organisation you are registering is a potential duplicate in the system. For this purpose, you need to fill in five data fields that enable the system to match existing database entries against your search criteria. Ignore proposed duplicates and continue registration If the details of the selected organisation do not correspond with the data of the organisation that you would like to register, just tick the box at the bottom of the similar organisation's list. This will allow you to proceed to the following step. Important: The system will not allow you to click on "next" unless you tick the checkbox confirming that none of the listed organisation corresponds to the one you wish to register.
How to use an existing PIC (i.e. registered organisation) If you think that one of the listed organisations might be yours, you can get more information by clicking on it. Click on the In order to be able to change some data before using the PIC, you might want to contact the LEAR (Legal Entity Appointed Representative) by email, by using the existing option.
Click the If no changes are needed, write down the PIC number and use it when creating your proposal. |


Organisation Data
| Multiexcerpt | ||||||||||
|---|---|---|---|---|---|---|---|---|---|---|
| ||||||||||
During the third step of the Participant Register Wizard, the Organisation page will prompt you to fill in three groups of data for your organisation: 1 - Organisation data , 2 - Legal Address , 3 - Contact Information Mandatory fields Click on the icon Error messages In case a value is entered in the wrong format, an error message will appear in red colour, below the data field and the whole row will be highlighted.
Saving a draft of the Registration After each step, the system will automatically save a draft of your registration. You can force the saving by pressing the save button at any time. The timestamp of the last saved draft is displayed next to the save button. Section 1: Legal name and status Enter the name of your organisation: The Legal Name of the organisation as stated in the legal statute or the registration act/decree establishing the organisation. The Legal Name size can be up to 240 characters long. The Legal Name should be in Latin characters (phonetic translation if the original characters are non-Latin characters). In the next four prompts, you will have to describe the legal status of your organisation by using the existing options. Click on the icon
Section 2: Registration data : Enter the 'Business registration number' of the organisation (if available). Enter the 'Registration Date' when the organisation was established/registered. Enter the 'Registration Authority' under which the organisation was established/registered. The Registration Authority is the official authority that registered the organisation (e.g. the administrative body of the city/region, the Chamber of Commerce, etc.). Specify the 'Legal form' of your organisation – expand the drop-down list and select the option that best corresponds to the legal registration form of your organisation. Please note that if there are legal forms starting with "***" at the bottom of the list, it means that you cannot select that specific form anymore, so it will be marked in red as an error when trying to the following screen in the wizard.
Provide the 'VAT number' of the organisation (if available) – click 'Yes' and enter the VAT number in the field that is will appear next to the button. Enter the 'Business Name' of the organisation (optional). The Business Name can be the official acronym or the native language appellation of the organisation. It can be up to 400 characters long. Select the 'Official Language' for the organisation. This is the language officially used for communication within the organisation.
|


Contact Data
| Multiexcerpt | ||
|---|---|---|
| ||
In the fourth step of the Participant Register Wizard, the Organisation page will prompt you to provide three categories of data for your contact data:
Note: See the FAQ section on the Funding & Tenders Portal and the Online Manual for more information about the LEAR role.You are required to fill in all the mandatory entry fields (marked with an asterisk *) and it is recommended to provide as much information as possible in all other input prompts. In the Address section ,
In the Phones section ,
|

Summary
| Multiexcerpt | ||
|---|---|---|
| ||
This step provides you with an overview of the entered data. Once you are sure that the data are correct and complete, you can submit by clicking the green |


Success page (+ what's next)
| Multiexcerpt | ||
|---|---|---|
| ||
Your PIC is communicated and you can use it already to submit a proposal via the electronic proposal submission service. If you want to provide additional information, click the
|


How to access the Update page from the Funding & Tenders Portal
| Multiexcerpt | ||
|---|---|---|
| ||
It is through this page that you can access the data of your organisation; either right after completing the registration or later. Simply access the Participant Register via the Funding and tenders opportunities and select Organisations on the left. Select the organisation and click on the
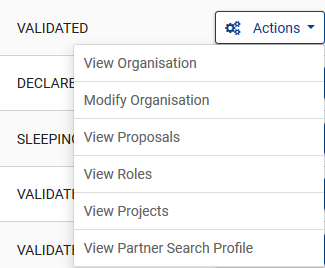
Who can edit/view the data of a non-validated organisation For organisations which are not validated yet, i.e. cases before a LEAR role has been identified, a contact person (Self-Registrant role in the system) is appointed to edit/view the data of the organisation. The person registering an organisation for first time, being granted a Self-Registrant role by default, will be able to manage the existing or assign additional Self-Registrant roles. Select the Manage roles option from the list when clicking in the Action button to do so, and follow the instructions as provided in the Access Management and your organisation page. You modify the data of the organisation by selecting Modify organisation from the Action button. Other actions will be also available such as manage the partner search of the organisation in the Funding & tenders portal.
If you do not have the Self-Registrant Role, the options in the list, when clicking the Actions button, will be limited to contacting the organisation.
Please, also bear in mind that:
|


Contact & Support
| Multiexcerpt | ||
|---|---|---|
| ||
You can use the Messaging function in Participant Register to contact EC Validation Services (see this section for instructions on how to use this functionality) . Refer the Research Enquiry Service and Participant Validation for further assistance. Refer to the IT Helpdesk Contact Form for any IT-related problems that you might experience with the Portal / Registration facilities. Note Procurement: please, visit the e-PRIOR wiki where you will find Procurement specific FAQs, as well as the contact details for both Supplier Portal and Procurement support. |
Content of the Update page
| Multiexcerpt | ||
|---|---|---|
| ||
The Update page consists of a series of data input fields and selection lists organised thematically by groups on a single page. You can also manage your Messages and Documents through the relevant sections. The data groups are Organisation (Organisation data, Legal Address, Contact information), LEAR, , Bank Accounts, Programme Specific information (only applicable to grants: Legal Status, Indirect Cost Method, Certification), ERASMUS (only applicable to EACEA programmes), SME, Financial capacity. When updating their data in Participant Register, the activities section is presented on the top of the scrolling page as dismissible alerts. Each activity can be closed by clicking on the "x" icon. These alerts will appear in following cases: When data is required from the LEAR and/or Financial roles
When documents are requested from the participants:
If there are unread messages: |


Structure of the Update page
| Multiexcerpt | ||
|---|---|---|
| ||
The Update screen is divided into 3 main parts:
links to user manuals. 3. The body of the page containing the data section, on the right, consisting of a series of data groups.
Layout of data groupsData groups are the main part of the Update Page of the Participant Register. They contain the data you entered during registration and other data sections to provide additional information. Some Groups (Organisation, Programme Specific Information) are structured into sub-sections. The icon next to the data group header gives you information on the submission status of your data (To submit, requested, formatting error).
|


Data Fields
| Multiexcerpt | ||
|---|---|---|
| ||


Navigation Menu
| Multiexcerpt | ||
|---|---|---|
| ||
The navigation menu allows an easy navigation through data groups and section of the Update page. You can select the relevant data section to view or edit your organisation's data. You do not need to fill in all sections; it will depend on whether you are applying for funding or tender opportunities. We will indicate in this guide when one of the sections is not applicable to a specific domain. The navigation menu also provides information on the status of data submission in the Update Page. Read more about icons and symbols within the navigation menu in the following paragraph.
Icons and Symbols
Important: When this icon is displayed, you cannot submit changes until the data is entered in the correct format; 2. Data not Submitted: every time you modify data, a yellow icon
Important: You are advised not to close the browser tab while the page shows a "To be Submitted" icon as the system will not retain your modified data. The system will display an alert should you accidentally close the browser tab. 3. Data Required: the 4. Document Requested. The number inside the red box All requested documents, as listed in the document section below, can be uploaded one by one. 6. Info tips: for each field, click the icon |


Data Groups
Organisation
| Multiexcerpt | ||
|---|---|---|
| ||
Note Procurement: The following process to update the basic data of your organisation is applicable to all cases, including Procurement. Nevertheless, please visit the e-PRIOR wiki for procurement specific information. In this section, you can update your registration data: Organisation's name, Legal Address and Contact Person's Information.
After applying modifications by clicking on Submit Changes has been clicked, you will get a pop-up window asking to confirm the changes.
If the change requires validation, and the organisation is currently in Valid status, the pop-up window will ask you to attach a document proof to confirm the change (see the PDF icon below):
If the change does not need validation, you are not requested to provide any documents.
Note about the legal form: depending in the selected country, there could be legal forms that are not to be used any more. Those are indicated by "***" and appear the bottom of the legal form list. Select a different form if you selected one of those non-allowed ones.
|


LEAR
| Multiexcerpt | ||
|---|---|---|
| ||
Note Procurement: The following process to nominate a LEAR is applicable to all cases, including Procurement. Nevertheless, please visit the e-PRIOR wiki for procurement specific information. The LEAR data group allows you to add or update personal information of the Legal Entity Representative of your organisation. If there is no request for LEAR data, your LEAR tab will appear as below:
By clicking Continue, an invitation to register is sent to the provided email address. You will have to wait for the LEAR to accept the invitation before you can continue providing LEAR data.
Also a notification in the Activity section of the page will remind the person registering the LEAR data that it is temporarily not possible to continue the LEAR appointment process.
Only when the future LEAR accepts this invitation, you will be able to resume LEAR appointment. You will be notified by email, and the LEAR section will display a disabled "continue" button that will be reactivated once the EU LOGIN invitation is received and confirmed.
If the entered email exists but either the first o last name is not provided as registered for that email address, you need to correct the details. It is not possible to use a registered email address if the rest of details do not match the details as registered.
If the account credentials do not match the information recorded in EU LOGIN. The participant will have two options: a) Asking the future LEAR to modify first name and/or last name accordingly directly in EU LOGIN, or b) entering a different email Address If the provided details are as registered and no problems are found, you can click on  Tick 'Yes' if you want to reuse details of the organisation as previously provided in Participant Register. Make sure to enter a Mobile phone for the LEAR, at the bottom of the screen, so that the activation PIN for the LEAR account gets sent by SMS. If the email address of the future LEAR has not been registered yet, you will have the option of "inviting" him or her to register. When data has been provided for the Lear Data Screen, click on Enter the first and last names and the position of the person who can represent your organisation in the Legal Representative data section. He or she will have to sign the original documents required for appointing a LEAR. This can be the CEO of the company, the rector of the university, the Director-General of the institute, etc. .
Click next again to go to the following screen. You will be prompted to submit electronically both the LEAR Appointment Documents and the Legal Representative/LEAR proof of identities.
When applicable, you are provided with a pre-filled pdf document where the data you entered during the LEAR registration wizard has been used to fill in the document. Click on the pdf icon to download it, then print it, get it signed and upload it again using the pencil icon. A reddish pencil means that document is still to be uploaded. When the document has been provided, the pencil turns yellowish. Also, when a document has been provided, the time and date of the upload appears, together with the name of the file, next to the status. Click on it to display the content, except for the identity documents which cannot be previewed due to privacy reasons. Note: The templates are already filled in with the information entered in Participant Register where only one Legal Representative can be specified. If more than one signature as Legal Representative is needed, the second signatory should write his/her name and sign below the first one. In such a case, the ID documents of all signatories should be combined in a single file and uploaded as document type 'Legal Representative Identity document'. The Submit button remains disabled until all documents have been provided. If information was previously provided and saved in the LEAR Data and Legal Representative Data screens, and you go back in the wizard to modify it, when coming back to documents window, the changes will be listed, and the previously uploaded documents, except the ID related files, will be removed, since new templates will have been generated at this point, containing the updated data. You need to upload the document again.
When finished uploading the updated documents, click on Submit. Only after clicking Submit the data will be transfer to validation services, otherwise, any changes remain on level of your PIC and Validation Services will not be aware of any changes on the LEAR info of your PIC. After submitting to validation, back to the main screen of the Participant Register, you will see 'Data Provided' under status, in the LEAR data section.
You do not need to submit your data changes by clicking the submit changes on the left, as for the rest of updates. Once the documents have been uploaded and you have clicked Submit in the LEAR wizard, the change is submitted for validation. If you are updating something else, you need to click on the New update request button for further editing. You can edit the LEAR data by clicking on the Edit button. If you apply changes, you need to upload the documents again, using the new generated templates. Then, you need to submit again for validation. .
. LEAR ReplacementThe process to change the current LEAR is the same as the one to appoint a LEAR. However, you need to meet following condition for you to replace the LEAR in Participant Register:
To replace the LEAR, click on the
Follow the same steps as when you appoint a LEAR for first time. The appointed LEAR will need to have an existing EU LOGIN account linked to his/her email address, otherwise the person will need to create the account first, and you will be able to resume the replacement afterwards. Note: It is important to maintain the data of your organisation up to date, and to ensure that there is always at least one person able to manage your organisation details in Participant Register. However, if you perform changes in your organisation data, including LEAR, but your organisation is not currently involved in any project, validation will probably not occur. As explained at the beginning of this document, this is not a problem at all, validation is done only as long as involvement in grants requires so. Nevertheless:
|


Bank Accounts
| Multiexcerpt | ||
|---|---|---|
| ||
Note Procurement: The following process to add a bank account record for your organisation is applicable to all cases, including Procurement. Nevertheless, please visit the e-PRIOR wiki for more procurement specific information. The organisations, when already involved in funding procedure, will need to register a bank account in the EU system in order to receive payments. Please note that you do not need to provide a bank account when registering your organisation for the first time. The Bank Account wizard will be available only when the Organisation data has been validated or is undergoing validation, otherwise there is no New Request button and the Bank Account area will be greyed out:
To register a bank account, click on the New Request button. A wizard will guide you while filling the bank account details. At the end of the process, you will be requested to upload one supporting document and submit it the request for validation. Please note, some of the details (account holder name, bank name, account number, etc.) need to appear in the supporting document for it to act as evidence for validation. Note: The New Request button is not available if there is an existing bank account in draft status. If you do not wish to submit the existing draft, please delete it using the bin icon After submitting your request for validation, the LEAR will be informed via email for the three possible scenarios. Please note that none of these scenarios will apply if no Bank Account details are required yet for your organisation, and no notification will be received until the request is actually undergoing a validation process:
Tip: You can submit more than one record. However, only a draft can exist at a time. The New request button is only visible if there are no existing drafts. If you do not wish to submit the existing draft, please delete it using the bin icon
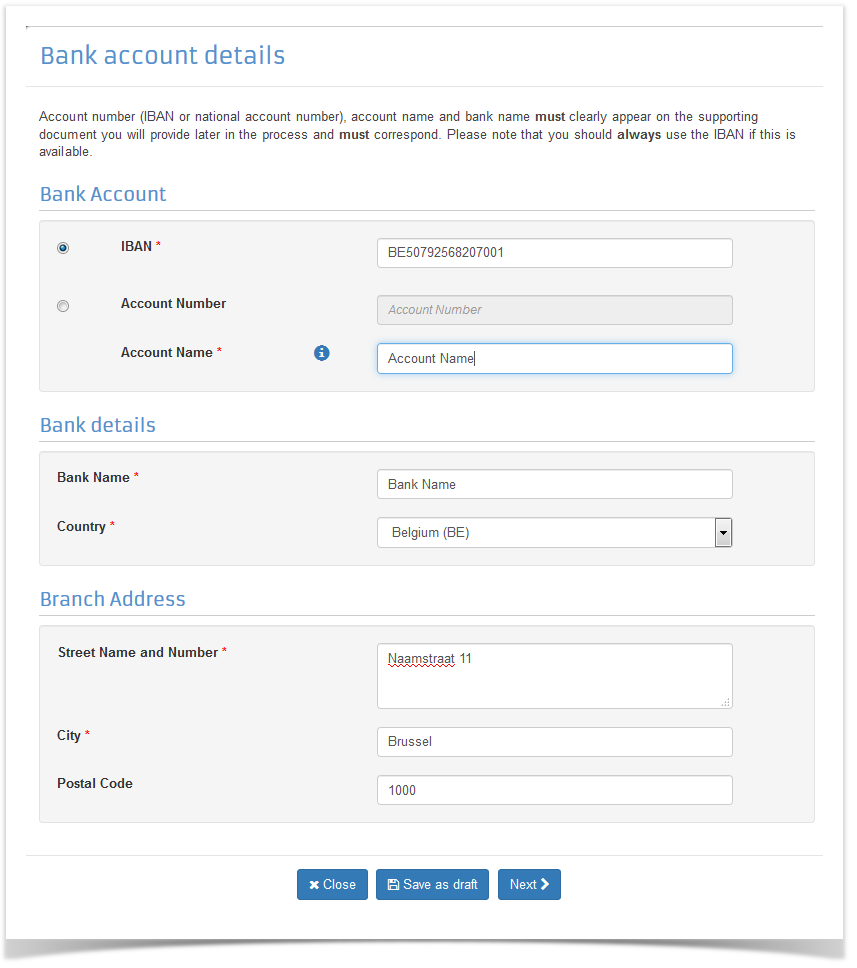
Filling in the Bank Account detailsTo enter the bank account details click on the
The account name is usually the one of the account holder, but the account holder may have been registered differently at the bank. Populate this field to reflect what is visible in the provided supporting document(s). Under the Bank Account section, you need to provide the account number. You can either select to provide the International Bank Account Number (IBAN), or when not applicable, use your account number. The system will check correctness of the details entered in this section once the Branch address is populated. If errors are found, they will be indicated. In the example below, the provided IBAN lacks one number for the provided country: If you select Account Number, the system will ask you to provide the account number and the BIC/SWIFT code. The SWIFT code you need to enter has to have up to 8 numbers, so if your SWIFT code is 11 characters long, for instance, you would need to enter just the first 8 characters:
Only if the selected countries are Canada, Australia/New Zeeland or EEUU, you will need to fill in an additional field, called "Branch Code" in the wizard, which corresponds to the CA transit code, AU/NZ BSB code or the EEUU ABA code. The required format of this field will be determined by the selected country.
Then click Next. In the following screen, provide the Account Holder details.
Click on next to go to the final screen. You will upload the supporting document for the provided account. A recent statement, not older than 6 months, can be used as evidence for validation. Please make sure to hide any private information such as amounts and movements, but ensure that the date of one of the transactions is not older than 6 months, or that there is proof in the document which accounts for the document not being older than 6 months. Also, please ensure that the following details are clearly visible in the provided document:
In the unlikely situation in which you do not happen to have a bank statement as document proof, you have as an alternative the possibility to upload a financial identification form that the Participant Register will generate using the provided data. You will need to have it stamped by your financial institution, then scan it and upload it into the system. Financial identification forms which are not stamped by the bank will be rejected. Click the link at the bottom of the screen to download the form.
To upload the documentation:
Please note that it is possible to save the Bank Account validation request in any of the three steps of the wizard by clicking on the Follow Up RequestOnce you have submitted a Bank Account request, the status will remain as Data provided and you will not be able to modify it. The validation of a Bank Account request is not automatically triggered, it only starts when the organisation is being validated or has been validated in the past. During the validation process, you could be contacted by Validation Services regarding your request. The LEAR/Account Administrator will receive an email informing that a follow up is needed, with indication of the reason for follow up mentioned in the email.
You can, at that moment, go back to the PIC in Participant Register and performed the modifications as requested. Instead of the View button, and Edit button will be available. There will also be an envelope close to the BA request,
Click on the envelope to display the details of what is being requested to be modified.
Click on the Edit button to access the details, then perform the actions as requested, and then submit again by using the Note: The original provided documents after submission cannot be removed from the request, but you can add new documents if being requested to do so by Validation Services. If the request gets rejected, you will be also notified via mail of the reason of rejection. When accessing the list of bank accounts provided for you pic, the rejected requests will be also listed. Click on the envelope icon in order to check the reason for rejection.
|


Programme Specific Information
| Multiexcerpt | ||
|---|---|---|
| ||
Note Procurement: This section is not applicable for Procurement Procedures. For EACEA programmes, an additional section will be displayed called "Erasmus Charter". If applicable, data will be visible under that section for them. Legal StatusThis section enables you to add or update the information about the Research legal status of your organisation. For Horizon 2020 participation, an entity that does not have a legal personality under the applicable national law, will only be accepted as a legal entity on condition that its representatives have the capacity to undertake legal obligations on behalf of the entity and that they offer guarantees for the protection of the Union's financial interests equivalent to those offered by legal persons. Note: A participant organisation can only be registered for the 7th Framework Programme if it is a 'Legal Entity' - any Natural Person, or any Legal Person created under the national law of its place of establishment or under Community or international law, which has a legal personality and which may, acting on its name, exercise rights and be subject to obligations. See below for a detailed description of each legal type. Non-Profit OrganisationA legal entity is qualified as a 'Non-Profit Organisation' when it is considered as such by national or international law (international organisations as well as any specialised agency set up by international organisations). Public BodyA 'Public Body' stands for any legal entity established as such by national public law, and international organisations. To define a legal entity as a Public Body, more criteria are required than just the direct supervision of a legal entity by the State, the public financing or the public service mission. International organisationAn 'International Organisation' stands for an inter-governmental organisation other than the European Community, which has legal personality under international public law. Any specialised agency set up by such international organisations is also considered an 'International Organisation'. International organisation of European interestAn 'International Organisation of European Interest' stands for an international organisation, the majority of whose members are Member States or Associated Countries, and whose principal objective is to promote scientific and technological cooperation in Europe. Higher or secondary education establishmentA 'higher or secondary education establishment' is an organisation, whose main objectives are training and education, and which produces diplomas recognised by the respective State. Research OrganisationA 'Research Organisation' stands for a Non-Profit Organisation, which carries out scientific and/or technical research as its main objective. The quality of being a Research Organisation must be stated in the statute of this organisation. Important – this status is based on self-declaration Large Research InfrastructureIt is only visible when the organisation and the Lear data facts have been validated. To define your organisation as a 'Large Research Infrastructure', please note that you should carefully read the instructions provided under the information icon
Civil society organisationYou can only select this option if your organisation is a 'Non-Profit Organisation' one and is NOT a 'Higher or secondary education establishment'.
FP7 Indirect Cost Method (ICM)If you are registering your organisation for Horizon 2020 participation, this information is not relevant and the 'Not Applicable' value defined by default can be left as such. If you are registering for FP7 participation, you can use the drop-down menu to define the relevant FP7 Indirect Cost Method for your organisation. The indirect cost calculation method is determined on the basis of the legal status of the participant, the status of their accounting system, and the history of indirect cost calculation methodologies used in previous FP7 Research participations (if present).
The participant shall apply the same indirect cost calculation method in all grant agreements under the Seventh Framework Programme. For any exceptions and for further information, please consult the Guide to Financial Issues. You can use the drop-down menu to define the relevant FP7 Indirect Cost Method for your organisation. Below you can find a detailed description of each Indirect Cost Method. Not ApplicableIndirect costs are set at a single flat rate for all H2020 participants, so select this option if you are registering for Horizon 2020 participation. Real Indirect CostsThis method is available to all categories of beneficiaries, which can identify their indirect costs using an analytical accounting system. Simplified MethodThis method is available to all categories of beneficiaries, which can only aggregate their indirect costs at the level of the legal entity and are hence unable to perform a detailed cost allocation. This method cannot be used if the participants have used Real Indirect Costs in previous FP7 Research participations. Specific Flat Rate of 60%:Also referred to as ´Transitional Flat Rate of 60%´. This method is available to certain organisations (Non-Profit Public Bodies, secondary and higher education establishments, Non-Profit research organisations, and SMEs that are active in research and development activities), which are unable to identify with certainty their real indirect costs unless they have used the Real Indirect Costs method or the Simplified Method before. The method applies a flat rate of 60% of the organisation's total eligible costs, excluding the direct eligible costs for subcontracting and the costs for reimbursement of resources made available by third parties that are not used on the premises of the participant. Standard Flat RateThis method is available to all categories of beneficiaries, unless they used the Re4al Indirect Costs method or the Simplified Method in previous FP7 Research participations. The method applies a flat rate of 20% of the organisation's total direct eligible costs, excluding its direct eligible costs for subcontracting and the costs of reimbursement of resources made available by third parties that are not used on the premises of the participant. ATTENTION: If your organisation participated in the 6th Framework Programme and used the Full Cost (FC) model, it can be assumed that your organisation has an analytical accounting system and would therefore not be eligible for the 'Specific Flat Rate of 60%' method in FP7 Research programmes. Such non-eligibility might be revealed through potential ex-post audits, with all the potential consequences for the organisation as a result. Certification DataThe Certification Data of an organisation, if present, can only be updated by the Validation Services Team on request. By default, the Certification Data content (when available) is in read-only mode in the Participant Register Update Panel unless there is an update request. The following visual example shows the state of an organisation without any certification data.
|


SME
| Multiexcerpt | ||
|---|---|---|
| ||
Note: This section concerns you only if you organisation can be considered as SME. For more information, check the SME information in the H2020 page in the Funding & Tenders Portal. The Small Medium Enterprise (SME) Status can be set and modified in this data group. Use this section to provide information about your SME Status. In some programmes, such as Horizon 2020 calls - SME instrument topics, the Self-Assessment is mandatory. Important: SME Information is optional if you apply for the Education Programmes, you may use the SME Self-declaration in that case. In the SME section of the Update mode of the Participant Register, you can:
Viewing the SME data of your organisationIf some SME data has already been provided, the first sub-section of SME data group will display a table with the existing SME information. Each table row relates to a specific existing financial year and displays the following information: - Financial year; - Result (SME/Not SME); - Type of SME data (Self declaration, Self-Assessment, EC validation); - Details (available for Self-Assessments and EC validations); - Financial Closing date; - Status (this shows the Important: the SME Data table is only visible if some SME information is available. Run the SME self-assessmentTo perform the SME self-assessment, you can click the START SME self-assessment button. When starting the assessment, please consider the following points: - You can find relevant information and guidelines on the "How to" link that you will find in the SME self-assessment section; - An SME self-assessment for a specific financial year will overwrite existing SME data for the same year; - After completing the SME self-assessment, you will see a new row appearing in the SME data table with the status - The system will save a draft copy of your Self Assessment and keep it for you to work on later. You can continue working on it by selecting the option Important : this option is not available if you completed the SME self-assessment wizard. Please, also note that the SME wizard do not support the use of mobile devices. Provide an SME self-declarationTo declare your organisation as SME (or not SME), you can use the option in the last section of the SME data group (SME self-declaration). After selecting your SME status, you must add a date and click the "ok" button. A new row will appear in the SME data table displaying the status "To Submit". In order to adopt the changes made, you must click the Nice to know: Q: SME Declaration and Self-Assessment: which Financial Year am I creating? A: The Financial Year you create is computed from the date you enter. For dates from 1/1/xx to 30/6/xx the system will generate the financial year xx-1; for dates from 1/7/xx to 31/12, the system will generate Financial Year xx. |


Financial Capacity
| Multiexcerpt | |||||||||||||||
|---|---|---|---|---|---|---|---|---|---|---|---|---|---|---|---|
| |||||||||||||||
If requested, the self-registrant or the LEAR/Account Administrator (when already appointed) must provide recent financial information (supporting documents).
A pop-up window will allow you to provide documents containing the financial information of your organisation. First, select the closing date to which the documents refer. You are requested to provide information for the last two consecutive financial years for which closed and approved annual accounts are available. You must insert the closing date of the latest of the two years. Depending on the selected date, the system will calculate the financial year. The financial statements for an accounting year with a closing date before June 30 are considered by the IT systems as related to the prior calendar year (e.g. if your accounting year's closing date is 31/03/2020, the financial year which will appear will be 2019).
Follow the steps according to your situation: Upload new document(s)
Use previously uploaded documents
When not all documents are available
Requests for additional information / documents
|


Messages
| Multiexcerpt | ||
|---|---|---|
| ||
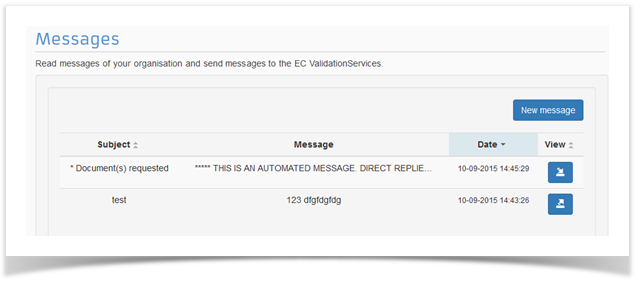
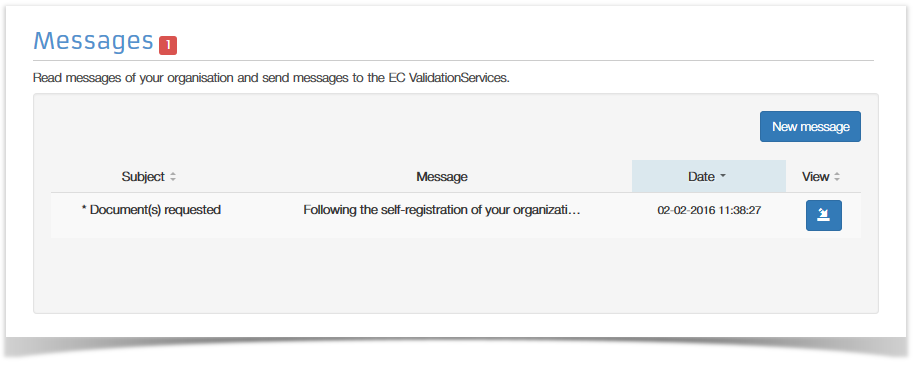
Note Procurement: The following process to compose and send messages via the Participant Register application is applicable to all cases, including Procurement. Nevertheless, please visit the e-PRIOR wiki for procurement specific information. Remember that the messaging page in Participant register is your single point of communication towards the validation team. However, no IT related questions will be attended via this channel. For any questions/issues regarding the tool, please contact your IT support. This section allows users, associated with the organisation, to create and send custom messages concerning the organisation, to the EC Validation Services. Use standard editing and formatting tools from toolbar and add a subject line. Click Sent messages can be viewed clicking the icon
The unread messages in the Messages section of the Participant Register Update are displayed in bold.
|


Documents
| Multiexcerpt | ||
|---|---|---|
| ||
Using the
Important: Documents which cannot be uploaded via the Documents section. The following document types cannot be uploaded via this section, and they need to be uploaded using the appropriate wizard in each case:
Size of the Documents: You can upload as many documents as you want but a single file cannot exceed 6 megabytes. For each document you upload, you can provide 'description', 'type' and other details when available. The Self Registrant/Contact person (and later, the LEAR, once appointed) can read and download existing documents for the respective organisation. Existing documents cannot be deleted once uploaded to the system. Multiple documents must be uploaded one at a time, taking into account the appropriate document type. Please note that uploading a document in the Participant Register will trigger the generation of an AL ID code. This code is included in the top right corner of the document and will be used by the Validation Services as a reference for the requested data to be provided. See section DOCUMENT MANAGEMENT for full details about document management in the Participant Register.Step by step procedure: Upload a requested document
Check the 'Original language' (4) box if the document is in the original language of the organisation (for example, the place of establishment of the organisation).
The document status is now defined as sent. Next time you will access the update page or after refreshing the page, the state will be "Received".
Step by step procedure: Upload a new document
 5. Select from the dropdown list (4) a document type; 7. Check the Original language (6) box if the document is in the original language of the organisation (for example, the place of establishment of the organisation). 8. Click on Submit for Processing (7) button to send the requested document or "cancel" to abandon document upload. 9. The document status is now defined as "sent". Next time you will access the update page or after refreshing the page, the state will be "Received"
Documents Status
The status of the Document will appear as "Requested" when Validation Services need the document in order to perform the validation of specific data (Legal Entity, Financial Capability).
After you sent your document by clicking on "Submit for Processing", the status of the Document will appear as "Sent" |


Submission of the data changes when validation process in involved
| Multiexcerpt | ||
|---|---|---|
| ||
After you finish editing your organisation's data, click the A confirmation dialogue will list all modified data groups that you wish to submit. To confirm the change, accept the pop-up confirmation window. If your organisation holds a "validated" status, or it is going through a validation process, depending of the fields you are modifying, you could be requested to provide a document to justify the modification.
If a pdf document icon appears close the data group you modified, as it is the case below, click Select Document to display the document selection functionality. Submitting a document together with the value change will be compulsory when the icon displays:
After clicking on "Select Document", the document selection functionality will be displayed. Click on the upload document to be able to add a new document. If you already uploaded documents via the Documents section from the menu on the left, you do not need to upload it again, but click on the Type field to select the document type you want to use from your uploaded documents instead.
Afterwards; click on the Document field to display a dropdown list where you can select the documents matching what you previously uploaded to the server for that document type. If no documents are being displayed or the one being displayed is not the current supporting documents to be used, you will need to upload a new one by clicking the upload button.
When selecting an already uploaded document, you will need to click on the Select button. The file name will display under the data group being modified.
Note: for validations purposes, only documents not older than 6 months are admitted, so in case your uploaded document is older than 6 months, you will have to upload a newer one. Only one document type per changed data group can be selected and submitted with the change, but you can add different document types to justify one single change.
You can unselect a document by clicking on the X icon; then proceed to upload a new one by clicking on the upload document button. If you select another document for the same document type, or upload a new one, the previous selected document will be substituted by the new selected one.
Note: when you select a type of document via the drop down menu, only the last uploaded one for that document type is being displayed, even if you have different documents available for the same type. If you do not select any value in the type drop down list, you will display all documents uploaded, including all documents matching a same document type:
If you are adding a new document, once you click on the upload button and get the upload a new document window, select the file by clicking the browse button, pick up the correct document type from the drop-down list and enter a description about the document. Do not forget to click the Original language field if the document is in the original language from the organisation.
Click on Submit for processing, you will see the system will upload the document for this record in the Documents section:
Once uploaded, you will see the uploaded document listed under the data group changed. You will be able to submit your change at this point by clicking on the Submit changes button.
Once submitted, your data on the Update page will be in "read-only" mode (View Organisation). Moreover, you will see a yellow pencil icon close to the field modified, indicating that validation is pending for this data update. You can neither modify data nor access specific tools such as the SME Self-Assessment Wizard in "View Organisation" mode. All data fields will be greyed out and the
Click |


How to provide righter information regarding the For profit status in Participant Register
| Multiexcerpt | ||
|---|---|---|
| ||
Note: This information concerns only funding opportunities for which the organisation needs to be an SME to apply. Error message "For Profit Organisations" when searching for my organisation during submission of a proposal For a number of calls within the Horizon 2020 Program, organisations need to be validated as 'for profit'. Otherwise, the error message below will be displayed and will block the organisation from submitting a proposal for certain calls:
Please follow this procedure step by step in order to have your organisation appear as a For Profit one and be allowed further through the submission process:
2. Click the Organisation data link. The Organisation data section is displayed. 3. Select the for-profit option button, then click the Submit changes button. Under section Legal Status, select the for-profit option button
4.Do the same for the Programme specific information data link If it is the status of SME what needs to be reviewed, follow the instructions from How to register an SME organisation. |


